Honeymooning in Kaua’i – Part 1 of 2

When I have to start a blog with “Back in [insert month],” that is when I know I have fallen behind on my posts. You might recall that the reason I started this blog was to better remember and reflect on my trips, but if I am writing posts several months later, I have probably already forgotten some details! Here is my commitment to being more timely with my posts.

Back in March, Justin and I travelled to the island of Kaua’i, Hawaii for our honeymoon. While I love to travel and explore, by the end of a trip, I usually feel like my cup is full and I am ready to go home. But at the end of this trip, I was not ready to leave and I felt we had “unfinished business” in Kaua’i. Nevertheless, we maximized the time we had, and are looking forward to a trip back in the future ツ.

Our primary reason for choosing Kaua’i for our honeymoon was because of all the amazing hiking opportunities available on the Island. In this post, I will discuss all the trails we completed in detail, and I will publish a “Part 2” that will cover our other activities, food and accommodation. I am hoping that writing shorter, more focused blogs, will also help me to publish posts more frequently ツ.

Anyway – while our trip to Kaua’i was only a week long, we managed to complete six hikes, and they are discussed below in order of completion!

Maha’ulepu Heritage Trail:

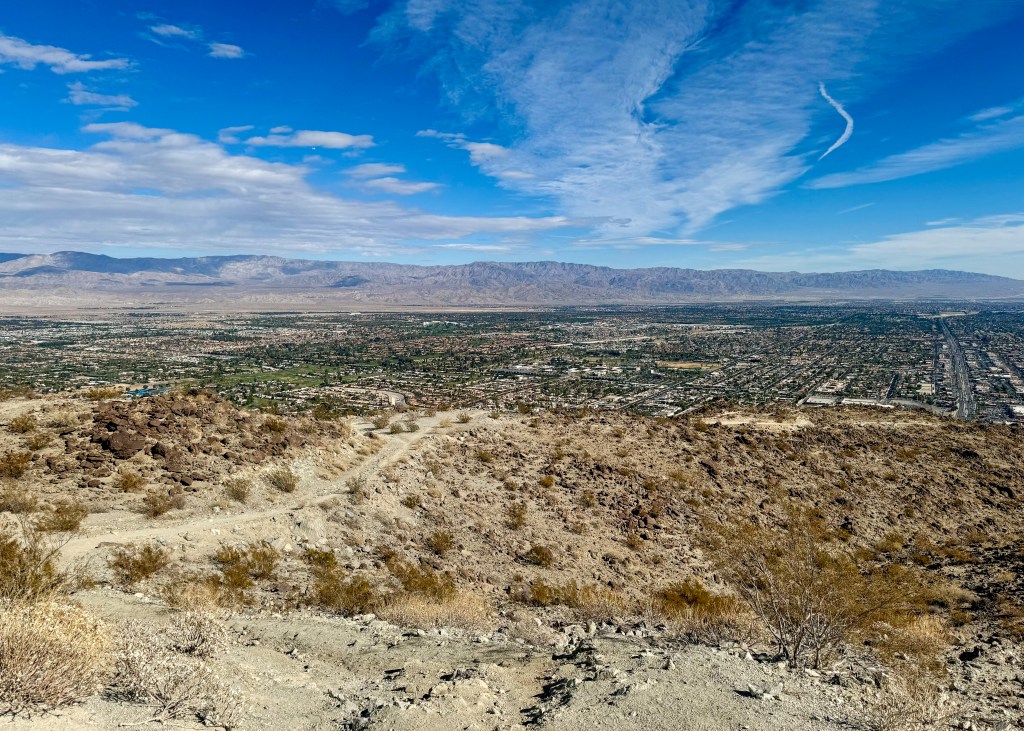
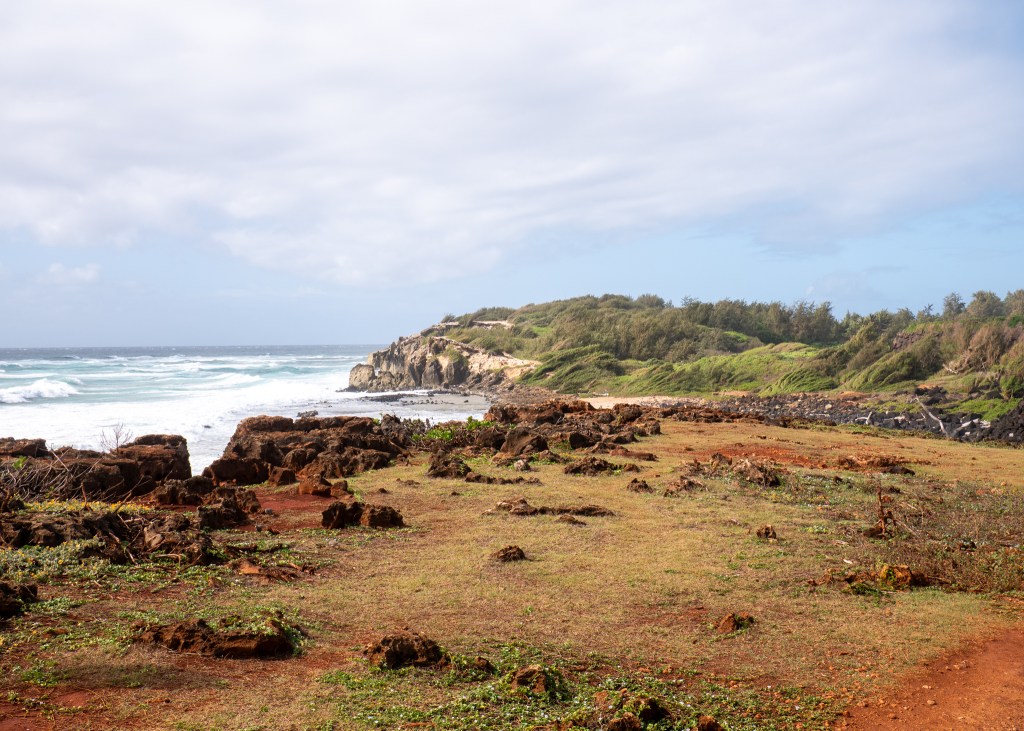
The Maha’ulepu Heritage Trail was the first hike we did in Kaua’i. This hike is classified as moderate on AllTrails – it is 6km long, and has an elevation gain of 122m. The trail is located along the southern coastline of the Island, providing beautiful views of the ocean and coastal cliffs all throughout. The trail ends at Gillin’s Beach, but you will pass several other sights along the way including Poi’pu Bay Golf Course, as well as the biggest limestone cave and fossil site in Hawai’i – Makauwahi Cave (although, we only encountered the Cave because we took a “scenic detour”). If you are looking for a fairly easy and peaceful walk near the ocean, I would definitely recommend the Maha’ulepu Heritage Trail.

Views from the Maha’ulepu Heritage Trail
The Makauwahi Cave we accidentally stumbled upon!

Sleeping Giant (Noun Mountain) East Trail:

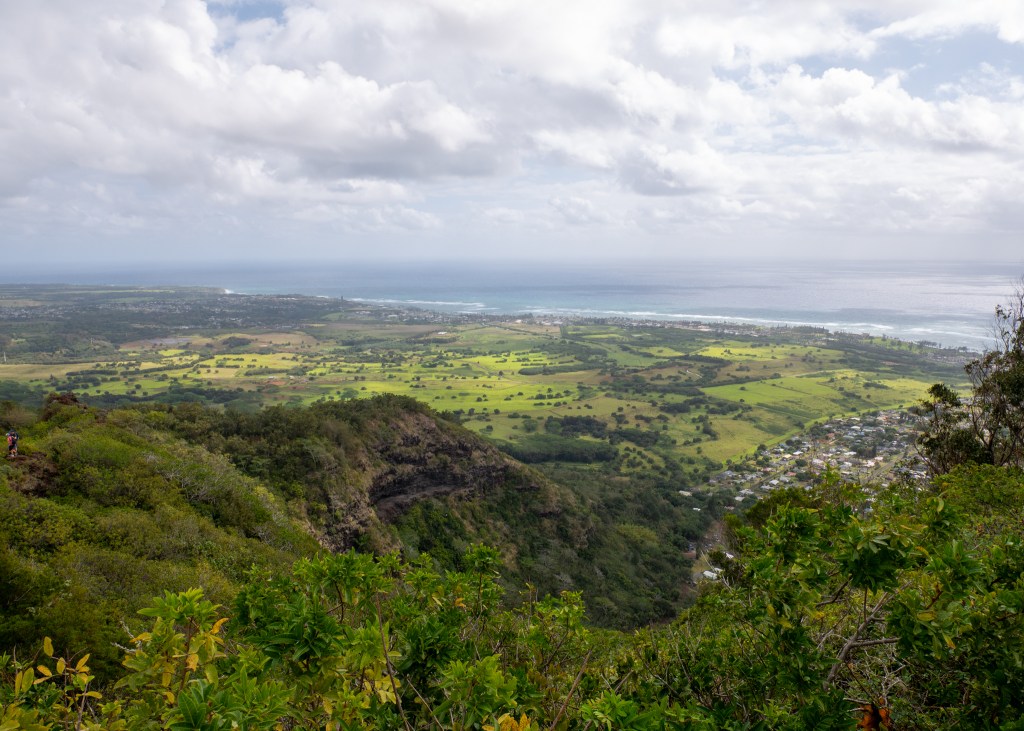
The Sleeping Giant East Trail was my second favourite hike that we did in Kaua’i. This hike is approximately 5km long, and it gets its name from a local legend, which tells of a “giant who feasted so much at a party in his honour that he laid down for a nap and never awoke” (as per AllTrails) – and I can verify that from a distance, the Sleeping Giant actually looks like a face! What made this hike a bit challenging was the fact that we did it right after it rained, making the trail slippery, and there is also a rock scramble near the end. However, the panoramic views from the top were worth it – we could see the nearby towns of Kapa’a and Waliua, as well as the Pacific Ocean. We found out after-the-fact that there are apparently caves you can explore right under the main viewpoint – if you end up at this trail, make sure you do not miss them like we did. But in the end, I am happy to report that we successfully completed the hike without waking the Sleeping Giant ツ.

Views from the top of the Sleeping Giant (as you can see, it was not the nicest weather day)

It is also noteworthy that there are two Sleeping Giant trails – the one we completed was on the east, but there is also a west trail that is shorter – it is only 2.7km long. We did not try this option, but basic math tells me that you should be able to get to the views faster, although it will be a steeper climb over a shorter distance.

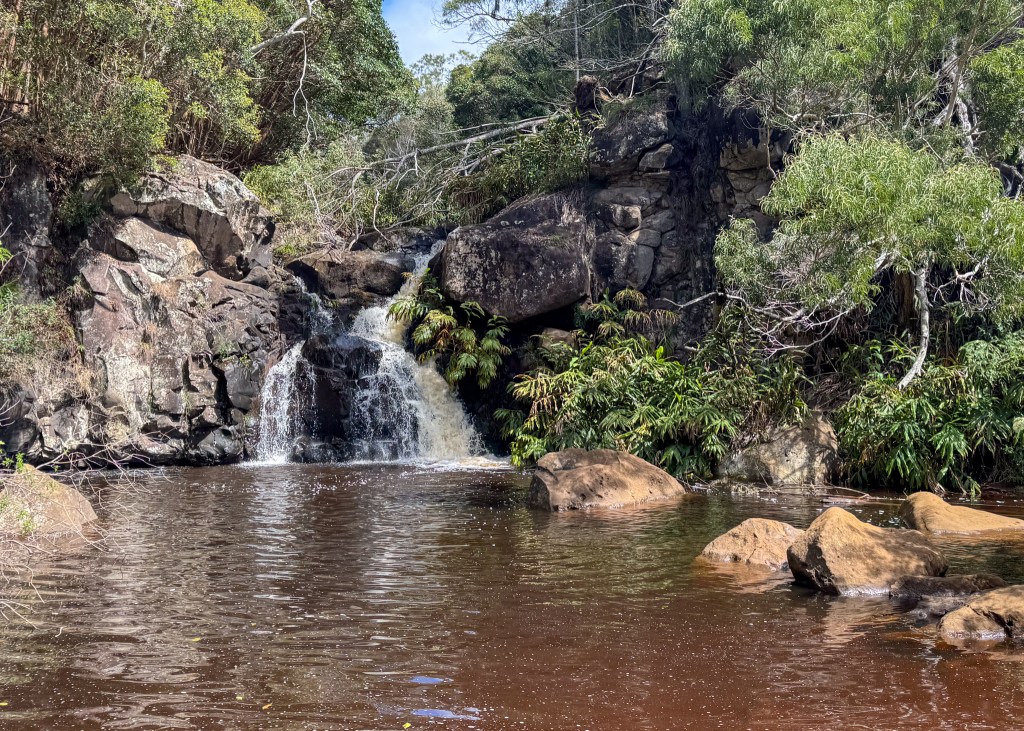
Ho’opi’i Falls Trail:

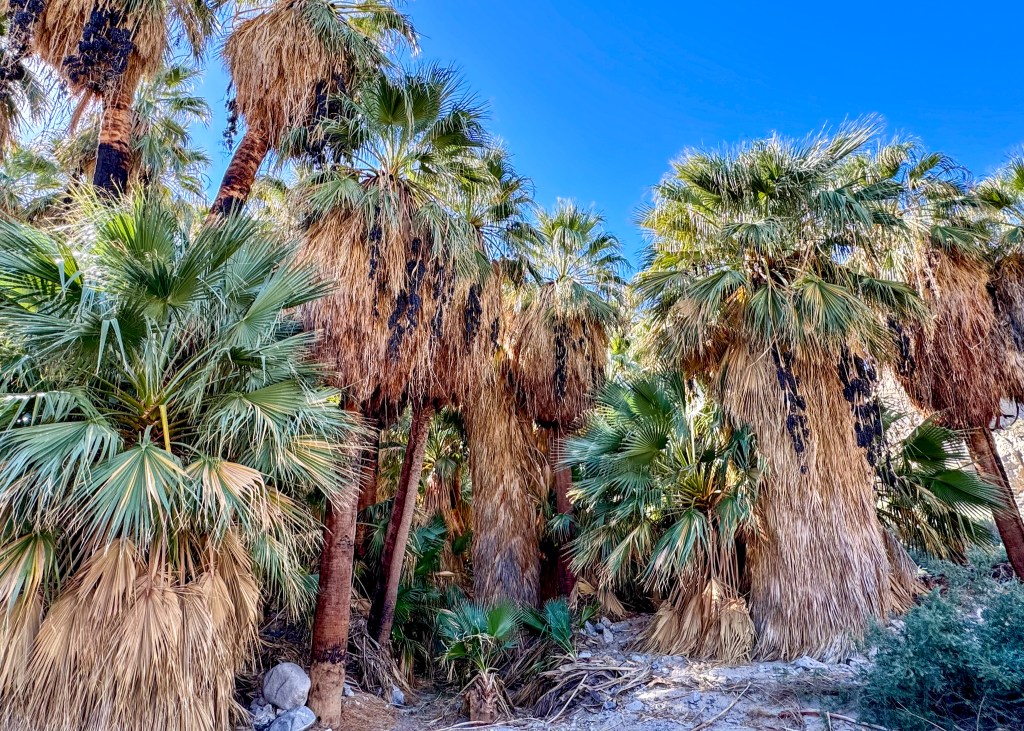
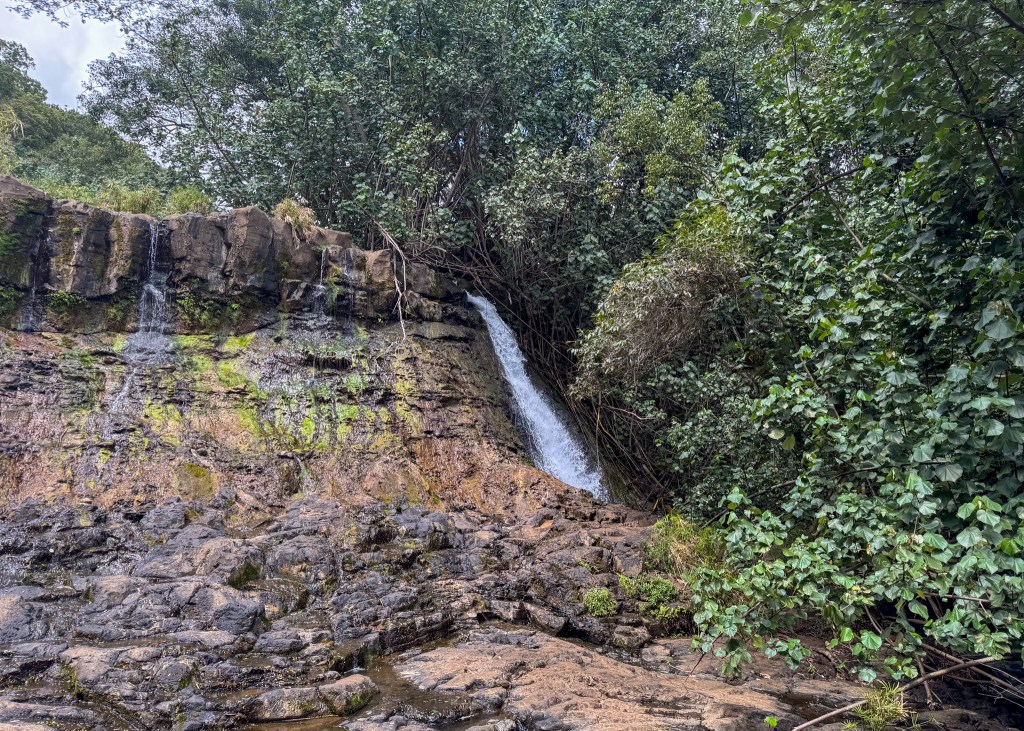
The Ho’opi’i Falls Trail is an easy walk we completed after conquering the Sleeping Giant. We felt we had some energy to keep going, but we were not looking for anything too strenuous as it was starting to get warm, and we were starting to get hungry (or “hangry” in my case ツ). This is an out-and-back trail that is mostly flat (64m elevation gain), ending at a beautiful little waterfall with a swimming hole. The hardest part of the trail was getting down to the waterfall, but there are lots of trees you can use to support your descent. This was the perfect way to end our hiking/walking activities for the day before heading back to our hotel to relax by the pool.
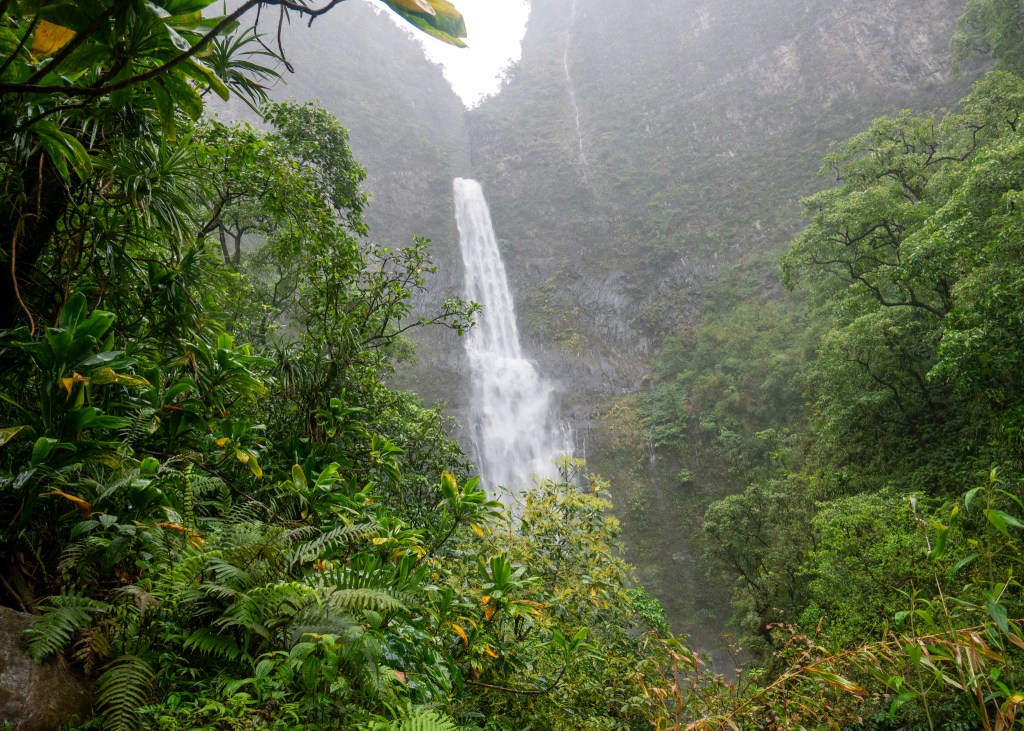
Ho’opi’i Falls
The swimming hole at the base of the Falls

Hanakapi’ai Falls:

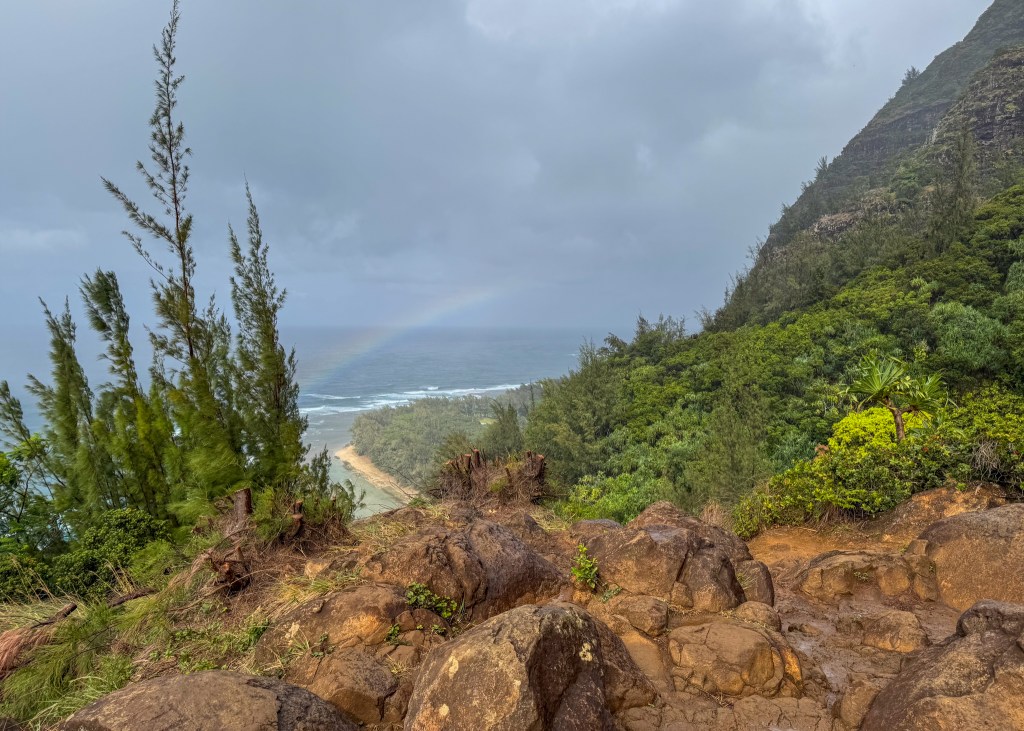
Hanakapi’ai Falls was my favourite hike of the trip, but was also the hardest and scariest, as well. This hike is located along the Nā Pali Coast in Haena State Park, and visitors are required to make reservations in advance. We tried making vehicle reservations on multiple occasions – staying up late as reservations are released 30-days in advance in HST – but we were not successful and had to opt for the shuttle option, instead. When we arrived at the park and saw that the parking lot had room for less than 10 vehicles, we were not surprised that we were unable to get a vehicle reservation!

Anyway, the Hanakapi’ai Falls trail is rated as hard on AllTrails, as it is 12.2km in length and has an elevation gain of 726m. Most of the elevation gain is at the start, before crossing the first stream crossing, and then a gradual incline for the remainder of the trail. When we first arrived at the trail head (via shuttle), there was a Haena State Park employee who greeted us, advising about the Hanakapi’ai Falls trail and conditions. When she told us that we would have to cross the “stream” five times before getting to the falls, I imagined a little bit of water, where the bottom of my hiking boots might get wet… but I was very wrong. In this case, the stream went part way up my thighs, and I am nearly 5’8” tall! Because it was raining, and had heavily rained during previous days, the stream was rising and moving very quickly, making it hard to get across. Luckily, we had hiking poles to help with stability and water resistance, but it was still difficult to walk through the stream, nonetheless. It was a bit funny how concerned I was about getting wet during the first crossing, but forgot all about it by the third time ツ.

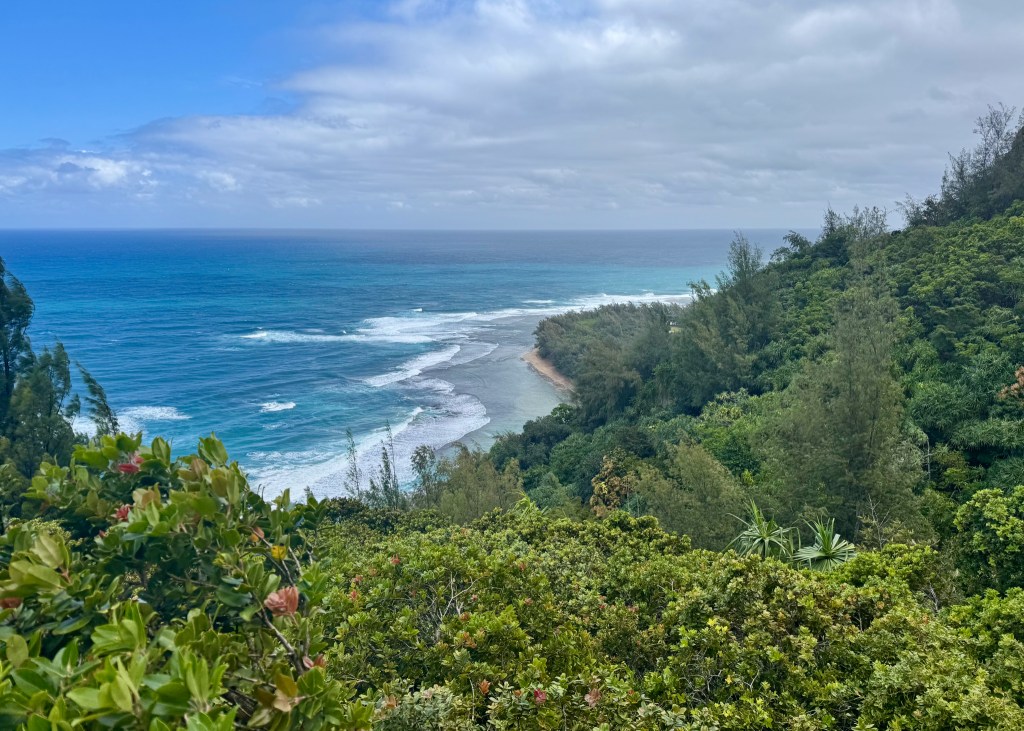
The trail itself is absolutely stunning – the surrounding forest is lush with greenery, and from certain points on the trail, you can see the Nā Pali Coast. The Hanakapi’ai Waterfall, itself, is one of the most impressive waterfalls I have ever seen – the lower falls (where the trail ends) are around 300-400 ft tall, but it is estimated that the entire waterfall is over 1,600 ft! We were able to stand right at the bottom, providing for an amazing perspective of the waterfall – we could feel the mist, and some people were even swimming at the base. 

Beautiful views of the coast from the Hanakapi’ai Falls Trail

While we did not go swimming at the waterfall, it was raining so hard that it looked like we had gone swimming… I was absolutely soaked, head-to-toe (and to think I bothered doing my hair that morning). It was actually very difficult to get a photo without water on the phone or camera lens. To make matters worse, I had my passport in my Lululemon belt bag which also got wet. When I got home, I had to replace my passport well before the expiry date, and I had to complete a special form which explained how my passport was damaged – lesson learned to leave my passport at my accommodation the next time I decide to hike in a rain storm!

Hanakapi’ai Falls

In the end, this trail was quite the adventure – it was slippery and muddy from all the rain, and the stream was more difficult to cross than usual due to the weather conditions – but it was all worth it!

We were rewarded with a rainbow on our way back after enduring all the rain ツ

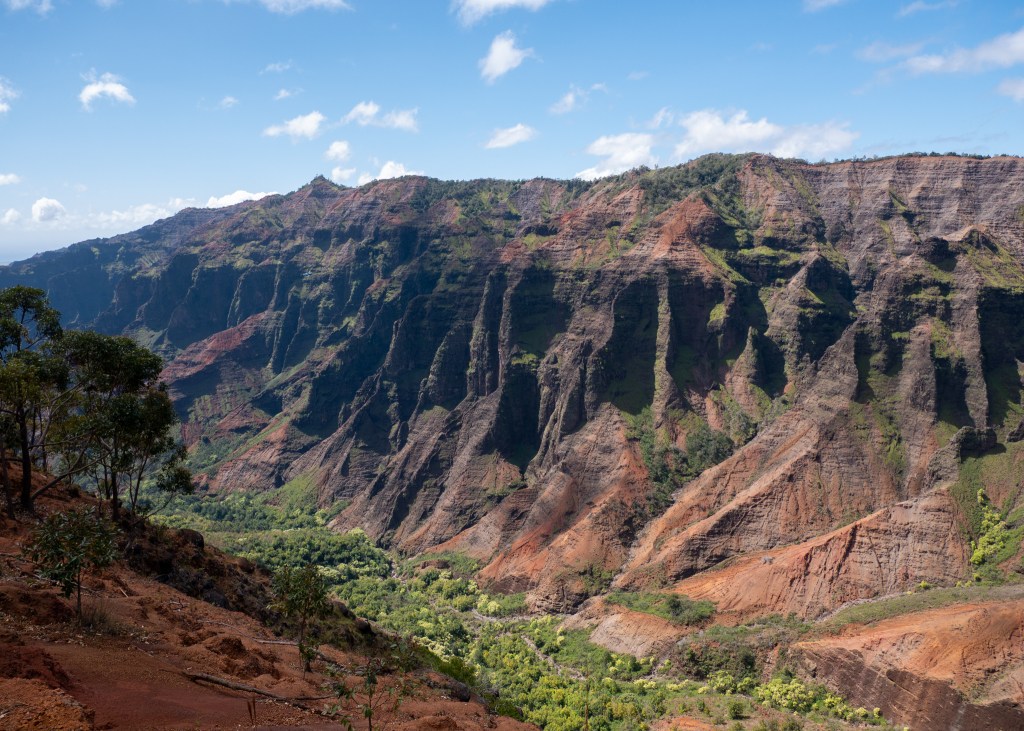
Waimea Canyon Trail to Waipo’o Falls:

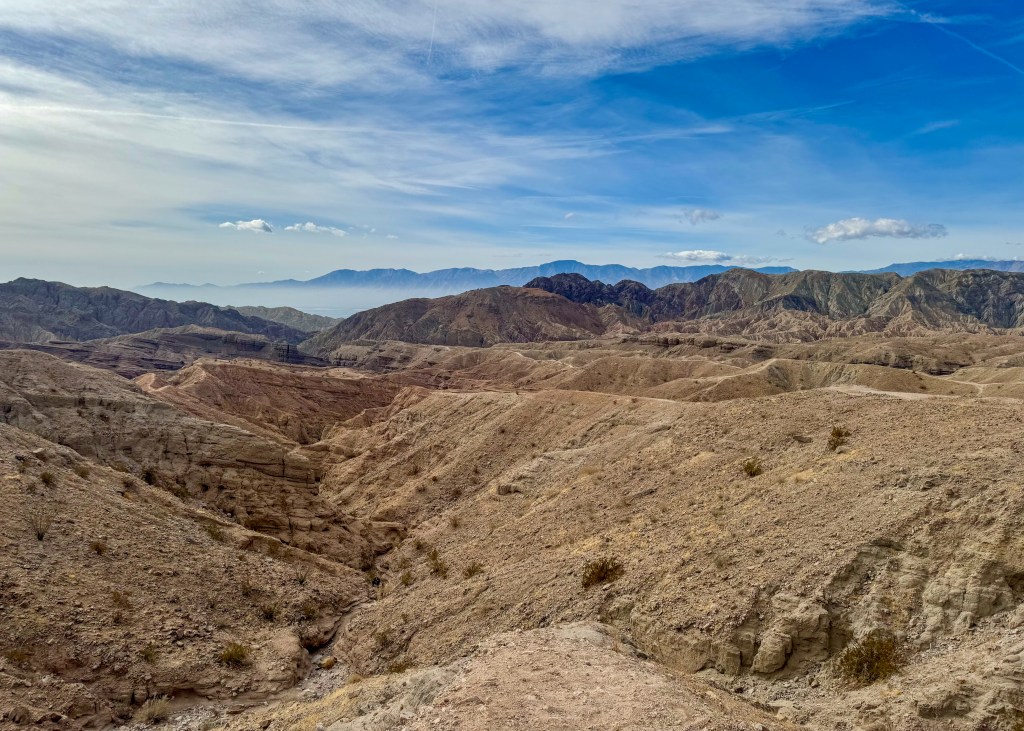
This trail is located in Waimea Canyon, which is often referred to as the Grand Canyon of the Pacific. Waimea Canyon was created by a volcanic eruption over 5 million years ago, and is 13 miles long, 1.5 miles wide and 2,500 feet deep. While there are many trails to explore at Waimea Canyon, we did not have a lot of time here, as we were heading on a Nā Pali Coast Boat Tour in the early afternoon (which I will tell you about in Part 2 of this post). For this reason, we chose to do the Waipo’o Falls via Pu’u Hinahina and Canyon Trail, as it is a shorter hike – it is 4.2km long and took around 2-hours to complete.

The first part of the trail consists of walking through the forest as you descend into the canyon. I will note that there is a considerable decline on this trail, as it has an elevation gain of 342m (over 2.1km). I was happy to have a hiking pole with me, as there were also a lot of rocks and tree roots to navigate. However, once you emerge from the trees, you will not be surprised as to why Waimea Canyon is referred to as the Grand Canyon of the Pacific – it is truly an impressive sight of red and orange rock, mixed with greenery (much more colourful than the actual Grand Canyon). 

The incredible views of Waimea Canyon from the trail

I am embarrassed to say that as I am writing this blog post, I am realizing that we did not see (or look for) Waipo’o Falls during the hike. There is a small waterfall at the end of this trail, which I had mistaken for Waipo’o Falls, but it is not the 800 foot waterfall we should have seen. Consider this your warning and reminder to make sure you look for this impressive waterfall (which fortunately, we did see from a different viewpoint in the park).

Not Waipo’o Falls ツ

Make sure to also stop by the swing on the trail (which is located before the small waterfall) for a great photo opportunity!

Moalepe Trail:

The final hike we did in Kaua’i was the Moalepe Trail. Similar to Ho’opi’i Falls, this hike made for a leisurely afternoon walk. The trail is 8km long, and took us around 2-hours to complete.

I will be honest, the first part of the trail is not very exciting – you will walk along a dirt path for approximately 45-minutes without a single view in sight. However, stick to it because around the half way mark (2.5km into the trail), you will encounter a swing (yes, another one) with incredible valley views – a luscious, green canopy of trees. The swing is actually difficult to get onto, as it is quite high – Justin had to hold the swing in place for me, while I climbed onto a nearby stump to pull myself up! But, the struggle to get on was worth it – it was a great photo opportunity, especially with the scenery behind me.

One of my favourite views of the trip!

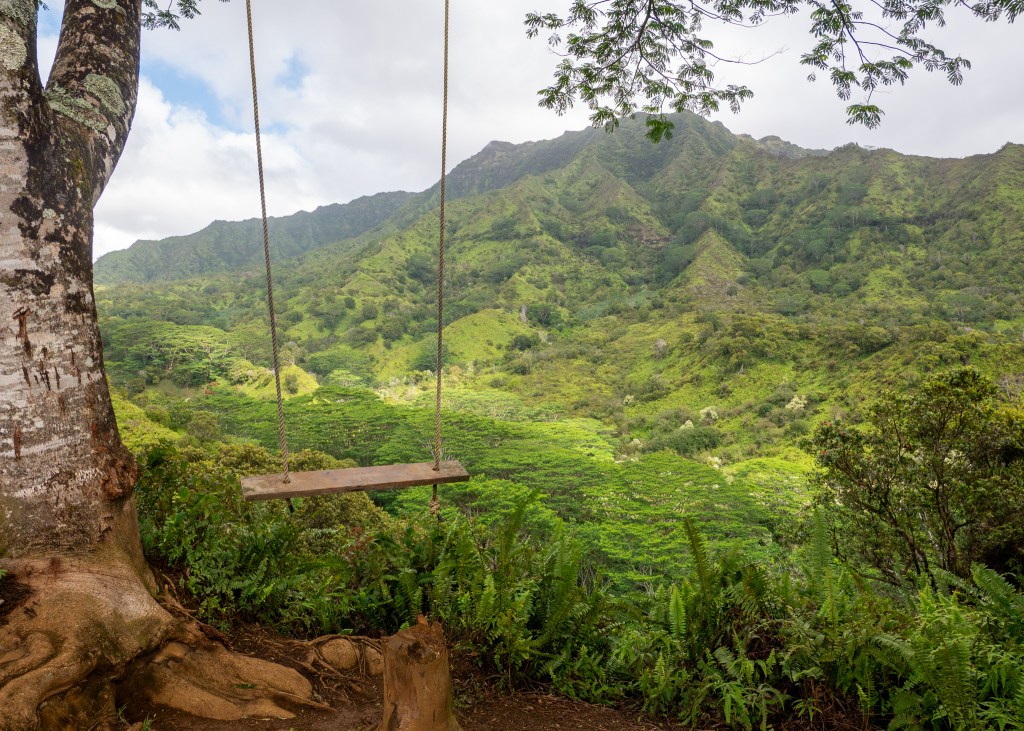
The views at the swing were definitely the highlight of the trail. If you are short on time, you could easily turn around and head back from here. The remainder of the trail is not well maintained – we would recommend wearing long pants as there is a section of “bush whacking” on the trail. Also, the end of the Moalepe Trail connects to another popular trail in the area called Kuilau Ridge Trail. We decided to briefly venture down the Kuilau Ridge Trail (which transition at the bridge), and came across another nice valley view, but it was not as nice as the view from the swing. The more I think about it, the more I would recommend to turn around after you reach the swing to make the most of your time ツ.

Well, I think that covers all the hikes we did in Kaua’i. Which one(s) would you try if you decide to visit this beautiful island? Make sure to keep an eye out for Part 2 of this blog post, which I hope to publish very soon!

Always grateful,

Michelle

The Desert Called, and I Answered… Again (California & Nevada – Part 1 of 2)

After writing several posts about our previous visits to Indio, California, it is starting to become difficult to come up with creative titles for my blogs – how did I do ツ? Subpar blog names aside, our last trip to the desert was in November 2024, and there was definitely no shortage of places to see and things to do during our visit, despite having already spent a lot of time in this area.

We spent the first part of our trip in Indio, before heading to Las Vegas, which provided us with easier access to Death Valley National Park, as well as Grand Canyon West.

Before I get started, a quick note for my email subscribers – did you know that when a blog post is emailed to you, you can click on the title, and you will get redirected to read the post on my website? This will allow you to see the cover photo I have set for each blog!

Indio, California

As you probably already know by now, one of our favourite things to do is hike, and during our most recent visit to Indio, we came across some great new (new to us) hikes to explore:

  • Bump and Grind Trail: The Bump and Grind Trail is a very popular trail for hiking, trail running and apparently mountain biking (although, we did not see any mountain bikes during our visit) located right near the city in Palm Dessert. About halfway through the loop, there is a “detour” that takes you to the highest point on the trail. If the gates are open, we would definitely recommend completing this additional portion of the hike – it provides beautiful views of the city and desert landscape. We also noticed (after-the-fact) that some reviews on AllTrails suggest doing the hike clockwise; however, we missed this detail and did the hike counter-clockwise. This made the downhill portion near the end a bit challenging – the trail was narrow, and there was loose rock and gravel. Learn from our mistake – go clockwise!
Views from the top of the Bump and Grind Trail
  • Ladder Canyon and Painted Canyon Trail: This was my favourite hike that we did near Indio! The start of the trail head is around 45-minutes from Indio, and requires driving down a dusty, gravel road. Part way down this road, you will encounter an abandoned trailer – if you see this, you are going the right way! As the name suggests, there are several rickety, old ladders that you will need to climb to navigate your way through the canyon. The recommendations on AllTrails (we paid attention this time ツ) suggest going clockwise to ensure you are going up most of the ladders, rather than down. We would also suggest downloading a map of the trail, as it is very easy to miss the first ladder; and, make sure to download it well in advance, as there is no service on the trail itself – I believe we lost service at the start of the gravel road. What I loved most about this trail was the diversity that it offered – you start by going up several ladders through a narrow slot canyon, before emerging onto a ridge that provides panoramic views of the surrounding desert mountains. After the ridge, you will descend back into the canyon to complete the hike, except the way back is along a much wider path (surrounded by colourful canyon rock), compared to the narrow slot canyon at the start of the hike. There is definitely no shortage of beautiful sights at the Ladder Canyon and Painted Canyon Trail.
Two of many ladders on the Ladder Canyon and Painted Canyon Trail
Views from the ridge along the Ladder Canyon and Painted Canyon Trail
  • Pushwalla Palms Loop: The Pushwalla Palms Loop starts off as a flat trail, but you quickly approach a hill that takes you onto a ridge, overlooking multiple different cities within the Palm Desert vicinity. After walking along the ridge (as seen in this blog’s cover photo), you will descend into a grove of palm trees, aka the Pushwalla Palms. This is the only part of the trail where you will find shade, and there was even a small water stream running between the trees. There was also a lot (and I mean a lot) of droppings from desert big horn sheep amongst the Pushwalla Palms. Fortunately, we did not run into a herd of sheep during our hike – you may recall how spooked I was by the big horn sheep that were watching me in Jasper. After walking through the palm trees, you will go up a rock scramble to begin your return to the trailhead. There are two ways to get back – you can either go back along the same ridge you used to reach the Pushwalla Palms, or you can walk below the ridge. We accidentally opted for the latter (we missed the path back onto the ridge), but would definitely recommend taking the ridge back for better views of the surrounding landscape. The Pushwalla Palms Loop was very different from the first two hikes we did, and we very much enjoyed it!
The end of the Pushwalla Palms grove – big horn sheep successfully avoided ツ
  • Jane’s Hoffbrau Oasis Trail: The last hike we completed while staying in Indio was Jane’s Hoffbrau Oasis Trail. The main reason I wanted to do this trail is because the photos on AllTrails showed a heart “structure” made out of rocks that I wanted to see – it was super cute! Similar to the Pushwalla Palms Loop, Jane’s Hoffbrau Oasis Trail also leads you into a grove of palm trees. However, the grove of palm trees at Pushwalla Palms appeared much bigger and healthier than the ones at Jane’s Hoffbrau Oasis Trail. There are so many different trails in this area that you can essentially “build your own adventure” and see where it takes you! If you are looking for a slightly easier trail to do closer to the city centre, then this one is a great option.
The heart structure and views from Jane’s Hoffbrau Oasis Trail

Other than our hikes, we made a quick visit to Pioneertown, an old western-style town that was previously used as a movie set. It is located around an hour from Indio, and is very close to Joshua Tree National Park. There are several shops you can visit along the main strip in Pioneertown, you can grab a drink at the historic Red Dog Salon, and visit the Film Museum, which displays posters of all the movies and TV shows that were filmed in Pioneertown.

An actual post office in Pioneertown
The structures and shops along the main strip in Pioneertown

Lastly, we made multiple visits to Chef Tanya’s Kitchen while exploring the desert. We enjoyed trying multiple different plant-based sandwiches (my favourite was the Chupacabra Chick’n), soup and ice cream – we cannot believe we did not know about this restaurant sooner!

The Road to Las Vegas

The drive from Indio to Las Vegas is supposed to take 4-hours; however, we made a few stops along the way, and it ended up taking us 8-hours. The problem with our timing was that we had tickets to the Vegas Golden Knights game that evening, and while we made it shortly after 7pm, we missed the warm-up and player introductions, which are Justin’s favourite parts. We would have made it on time had we not taken the wrong road through the Mojave Desert, and encountered terrible traffic on highway-15 due to a multi-vehicle accident.

Despite being late for the hockey game, we really enjoyed the stops we made on the way to Las Vegas:

  • Amboy Crater: The Amboy Crater is an extinct volcano located along the iconic Route 66 (more about Route 66 below). Apparently, the Amboy Crater last erupted over 10,000 years ago. You can actually hike into the Crater, but unfortunately we did not budget enough time for this (clearly) – we definitely hope to do this hike during a future visit, as the photos I have seen online look incredible! I will not bother sharing the photo I took, as it does not do this amazing sight justice.
  • Roy’s Motel and Cafe: Our next stop, just a couple of minutes further down Route 66, was Roy’s Motel and Cafe. In case you did not know, Route 66, often referred to as the “Main Street of America,” is one of the most well-travelled highways in the United States. It is 3,940km in length, and stretches from Santa Monica, California, all the way to Chicago, Illinois. While no longer in operation, Roy’s Motel and Cafe used to be a popular rest stop for travellers journeying through the desert up until the late 1970s. It just so happened that the day we were passing through (November 30, 2024), was the day Roy’s Motel and Cafe was having its Historic Mural and Monument Reveal event in honour of its 86th anniversary. There were food vendors on site, live music, and a lot of people! While we were not able to stay for the reveal ceremony (in an attempt to make it to the hockey game on time), we really enjoyed this stop! There are a lot of very cool photo opportunities here, as well – there is the neon Roy’s Motel and Cafe sign (which I can imagine looks very cool at night), and the Route 66 sign is painted onto the road in front. We may or may not have attempted to get some jumping photos on the highway with the two signs…
Self-explanatory ツ
Also self-explanatory!
  • Mojave National Preserve: One of the faster routes to get to Las Vegas from Indio is actually to cut through the Mojave National Preserve and connect to highway-15. Since this was the recommended route, we decided to make a couple of stops within the protected desert land. Our first stop was at the massive Kelso Dunes. While I have seen sand dunes before (when we visited the Yukon), the Kelso Dunes are massive compared to the small desert in Carcross – the tallest sand dune in Kelso is more than 600 feet tall! For some reason, I find tall mounds of sand deposited amongst other rock formations fascinating, even in the desert ツ.
The incredible Kelso Sand Dunes

We also stopped at the Kelso Depot Visitor Center. Here, we learned that Kelso used to be a booming mine town following World War II, and we also saw the original Kelso Jail that was used between 1940 and 1985 for housing “drunks and unruly individuals.” There is a lot of history and interesting sights within the Mojave National Preserve – we barely scratched the surface with our quick visit. We also saw some wildlife near the Museum, specifically a roadrunner, and a coyote – is it possible that our favourite Warner Bros. cartoons were inspired by the Mojave Desert? Fortunately for the road runner, Wile E. Coyote was on his best behaviour ツ. My distraction and determination to take a photo of the coyote is ultimately what resulted in us taking the wrong road when leaving the Kelso Depot Visitor Center. Instead of taking the Kelso Cima Road, we ended up on Kelbaker Road, adding several kilometres to our journey, and this did not allow us to skip the accident on highway-15.

The Kelso Depot Visitor Center – the Kelso Jail is on the left side in front of the palm trees
The coyote near the Kelso Depot Visitor Center

Well, I originally planned to also write about our adventures through Death Valley National Park and our stops in Nevada – but since this blog is longer than anticipated already, I will report on the rest of our trip in a separate post ツ.

Always grateful,

Michelle

Back to the PNW – Olympic National Park

I used to think that going six weeks in between blog posts was a long time, but now it has been five months since my last post! Life has been incredibly busy lately, and while I have started writing several new posts, I have not been able to finish one.

We have had a couple exciting adventures since my last blog post in February – we spent some time in Los Angeles, Jaco (in Costa Rica), on Vancouver Island, and most recently in Olympic National Park in Washington. I am going to share all my thoughts about Olympic National Park now while everything is still fresh in my head!

Olympic National Park is around a four-hour drive from where we live, making it a great option for a quick weekend trip. This is our 9th National Park visit in the United States, and it definitely did not disappoint! I actually bought a scratch off poster last year to track all the parks we have been to, but I am currently behind on this activity (being behind on things appears to be a common theme in my life right now…).

In order to explore Olympic National Park, we decided to stay in Port Angeles, which is the largest city near the park. We stayed in an Airbnb in a quiet neighbourhood with our friends, Iwona and Craig. The highlight of this location for me was all the deer (including the babies!) roaming the streets and nearby trails.

We did not spend too much time in Port Angeles, itself, but here are some notable shops and food establishments we checked out:

  • Our favourite restaurant was New Day Eatery. While I did not try the coffee here, I was advised by Justin, Iwona and Craig that this was their favourite coffee stop of the trip. New Day Eatery also had several plant-based (and gluten free) baked goods – it was actually difficult to make a decision due to all the options! Different scones, muffins, coffee cakes… if only calories were not a concern. We also had breakfast here on our last morning, and it was delicious.
  • A shoutout to Westside Pizza for offering vegan cheese – loved the vegetarian pizza option!
  • We all picked up our local swag at MOSS. I usually try to limit myself to one item, but I could not make a decision (apparently another common theme in my life). I ended up getting the Washington Nature Checklist t-shirt, and Iwona and I are also the newest members of the Out of Breath Hiking Society with our new hats. If you are hoping to pick up some Pacific Northwest gear, definitely stop by MOSS.
  • While we did not make any purchases, we enjoyed browsing the gift items, games and books at Port Book and News.

We essentially had two full days to explore the park, plus some time in the evening the day we arrived. One thing that makes Olympic National Park unique is its diverse ecosystem which is made up of the coast, forests and mountains. Since our daylight was limited on our first (partial) day, we settled on exploring a shorter trail amongst the forests – the Marymere Falls Trail.

This was a very peaceful and easy hike – we loved walking amongst the tall trees, breathing in the fresh air and listening to the water flow in the nearby creek. I would definitely recommend doing this hike later in the day if this is an option for you, as the light scattering through the trees onto the trail was beautiful.

Marymere Falls

Moving onto our first full day at the Park, we decided to drive out to the Washington coast to explore the beaches that make up Olympic National Park. Our first stop was at Cape Flattery, which was around an hour and 45 minutes from Port Angeles. Note that this area of the park is managed by the Makah Indian Tribe and visitors must pay an additional $20 USD entrance fee, on top of the National Park fee. In order to reach the beautiful cliff overlooking Neah Bay, you have to walk along a short, tree-covered trail – the trail out-and-back is less than 2kms. There are a couple of different view points once you get to the end, and all of them are spectacular!

The views from Cape Flattery

Our next stop was Shi Shi Beach, which was a 20-minute drive south from Cape Flattery. On AllTrails, you will find a 14km Shi Shi Beach Trail, but to actually get to the beach, it is around 3.5km. The trail to the beach was through the forest, and it was more muddy than we expected – I would definitely recommend hiking or waterproof shoes for this trail… leave your white sneakers at home ツ. Craig had actually seen a sign in the beach parking lot that made reference to the number “0.6,” leading us to believe this trail was 0.6 miles. You can imagine how surprised we were to have walked a total of 7km (out-and-back). But, upon returning to our vehicle, we realized the 0.6 miles was actually referring to the next parking lot for campers – oops!

While Shi Shi Beach appeared to be a beautiful spot, we were very limited in what we were able to see, as there was a lot of fog and low cloud coverage – I actually kind of enjoyed the eerie atmosphere ツ.

A moody version of Shi Shi Beach

Our final destination along the coast was Rialto Beach. This Beach was about an hour and 20 minutes away from Shi Shi Beach, and was just outside the city of Forks. Many people are familiar with Forks, as this is where all the Twilight movies were filmed – I personally had no idea as I am not a Twilight fan. Even though the series was filmed over 15 years ago, the town is not shy about capitalizing on this moment – you can find vampire swag in the shops in Forks, and the town refers to itself as “Home of the Twilight Saga.”

Blood-sucking mythical creatures aside, Rialto Beach is easily the nicest beach I have ever seen. When we initially got here, similar to Shi Shi Beach, it was quite foggy and actually very cold and windy! Have I mentioned that Justin did not bring a sweater or jacket on this trip ツ? Our plan was to walk along the beach towards the Hole-in-the-Wall rock structure (which is located about 2.5km one way from the parking lot), but unfortunately, the tide was too high and we did not make it to the end – but, we still got pretty close!

However, during our walk, the fog lifted and we were able to see the beach for miles – it was beautiful. My favourite part about this entire experience was the abundance of drift wood along the beach, which made for very cool photo opportunities, as well as the pelicans flying along the coast and diving for fish! Although, one thing I was surprised about was how tired I was from this walk – 5kms through the sand and rocks is no joke!

Rialto Beach after the fog lifted, featuring some pelicans!
Another photo of Rialto Beach – can you spot the Hole-in-the-Wall we were trying to reach?

After finishing up at Rialto Beach, and grabbing a bite to eat at Blakeslee Bar and Grill, it was time to drive back to Port Angeles, which was about 1 hour and 20 minutes away. Needless to say, we did a lot of driving on this day, but it was definitely worth it!

After touring the forests and coast, the last ecosystem we had left to explore within the Park (and it was also our last day) was the mountains, and our trail of choice was Hurricane Hill via Hurricane Ridge. In order to get to this trail head, you need to drive about 40-minutes through the park along a switchback road, up to an elevation of 5,252ft. Note that there are only three small parking lots near the start of the trail and they fill up quickly – we arrived around 9:30am and had to park at the furthest lot.

Despite the limited parking situation, I cannot say enough good things about this trail. The picturesque mountains, the colourful wildflowers and the views of Vancouver Island from the top were incredible. If you only have time for one hike in the park, I would put this at the top of your list!

Views from the top of Hurricane Hill – can you spot Mt. Baker?
Mountain views and wildflowers along the Hurricane Hill via Hurricane Ridge trail

In terms of difficulty, I would rate this hike as moderate – while it is fully paved, there is an elevation gain of 252m over 2.75km, which results in some steeper sections along the trail. If you struggle with downhill, I would definitely recommend bringing some hiking poles. The trail is also fully exposed – there are very few trees to provide shade.

After taking a lunch break to watch the EuroCup Final, we decided to finish our day in the forest with an easy walk around Crescent Lake along the Spruce Railroad Trail. We did not have enough time to complete all 18km, but we enjoyed the first part of the trail, stopping to sit by the lake to take in the Olympic National Park views one last time.

Views of Crescent Lake

Overall, we are very happy with our time spent in nature at Olympic National Park and we are already starting to plan our next National Park visit! Where should we go?

On a completely unrelated note, I am thinking about starting an Instagram account to showcase some of my travel photos. What do you think – should I do it? Do I have time, or will it just become another activity I am behind on ツ?

Until next time!

Always grateful,

Michelle