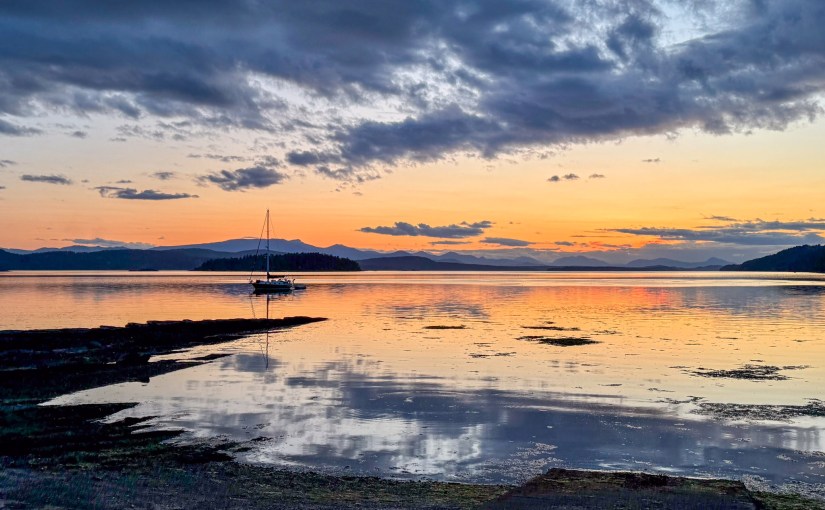
Justin, our dogs and my parents did a quick weekend trip to Galiano Island back in May 2025. However, after our visit, we felt we had “unfinished business,” and ended up booking a day trip back to Galiano Island in June – that is why this post is called One Island, Two Trips ツ. I will start by telling you all about the first trip!
Continue reading One Island, Two Trips – Galiano IslandTag: nature

Local Hikes of 2025
It is hard to believe that 2025 is officially over, and it is once again time for me to round up all the local hikes we did throughout the year within two hours of home and tell you all about it! I will be honest that 2025 was “light” for local/day trip hikes – we did a lot of hiking in general, but most of it was during trips to places I have not yet documented. I guess that means I better get bloggin’!
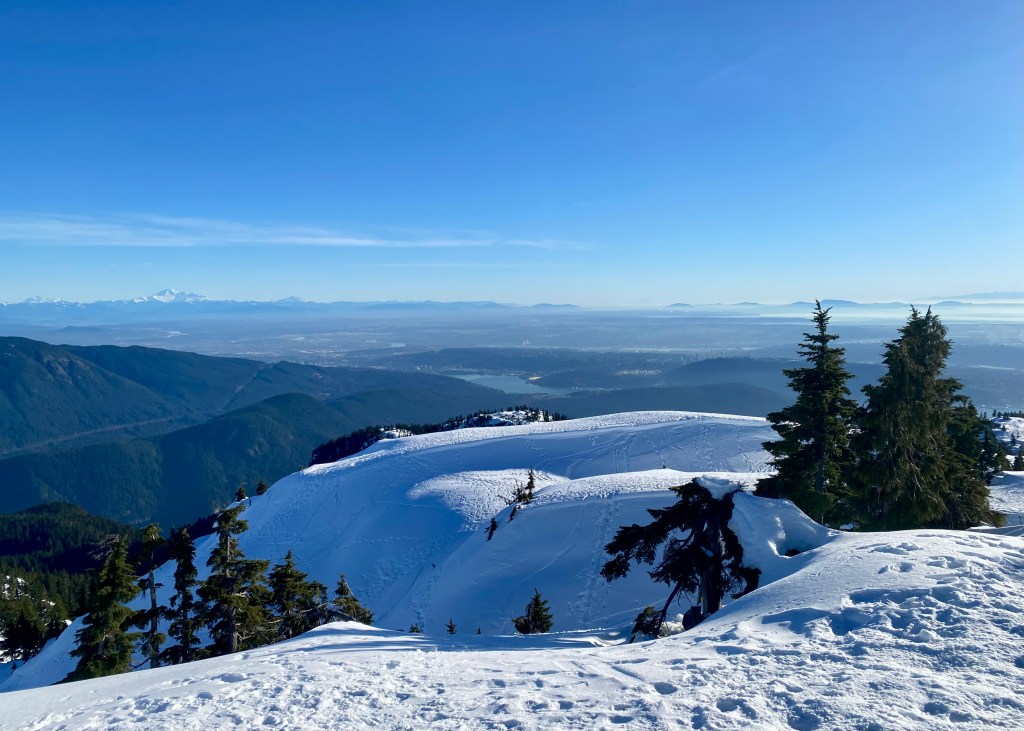
Pump Peak, North Vancouver (Mount Seymour) – January 2025:
My best friend, Iwona, and I wanted to go snow shoeing one day, and decided to make our way to Mt Seymour. We were initially going to snow shoe along one of the Mount Seymour Discovery Snow Shoe trails, but when we found out there was no fresh snow (and fresh snow is helpful for snow shoeing), we decided to pivot our plans and hike instead (with crampons, of course).
It was a beautiful, sunny day, and we initially decided to hike to Brockton Point. However, it only took us around 40-minutes to reach the end (before having to turn around), and since we were not ready to go back yet, we decided to continue onwards to Pump Peak. It was a challenging – but fun – hike, almost 7km in length, and we were rewarded with beautiful views of Vancouver at the top.
Lighthouse Park, West Vancouver – April 2025:
We had some unexpected sunny weather in April this year, and we were looking for a lower elevation trail to complete, as the higher elevation trails would still be covered in snow. We decided to go to Lighthouse Park, which has a network of trails you can explore in West Vancouver right by the Pacific Ocean – you can truly pick your own adventure!
For this visit, we opted to do the Arbutus Knoll and Eagle Point Loop, which was a great option for a short nature hike with beautiful views of the coast. This trail is almost 3.5km long, has an elevation gain of 180m and took us exactly 1 hour to complete – Lighthouse Park is truly a great spot if you are looking for a more “laid back” hike.
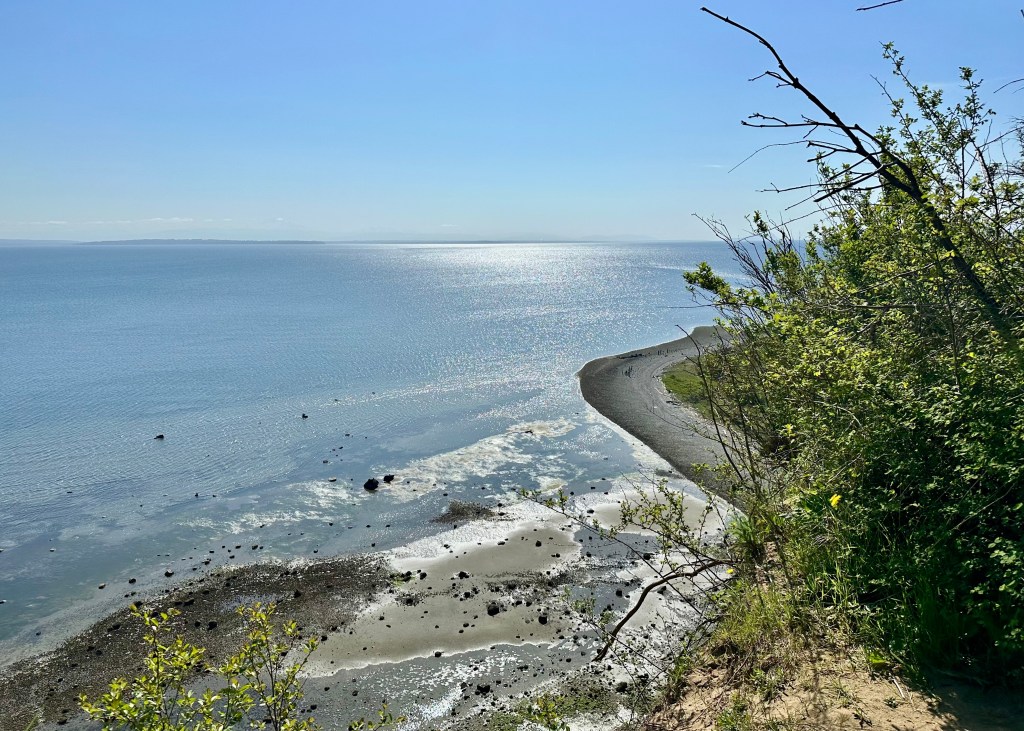
Lily Point Marine Park Loop, Point Roberts – April 2025:
Lily Point Marine Reserve is located in Point Roberts, a small part of Washington only accessible through Tsawwassen (South Delta). I would consider this trail to be more of a nature walk rather than a hike – the trail is is 3.1km long, has minimal elevation gain (83m) and is rated easy on AllTrails. While the trail is mostly amongst the tall forest trees, there is an opportunity to “detour” from the main path and walk along the beach. From here you will get beautiful views of the coast line and ocean, and we even saw several eagles flying above us high in the sky.
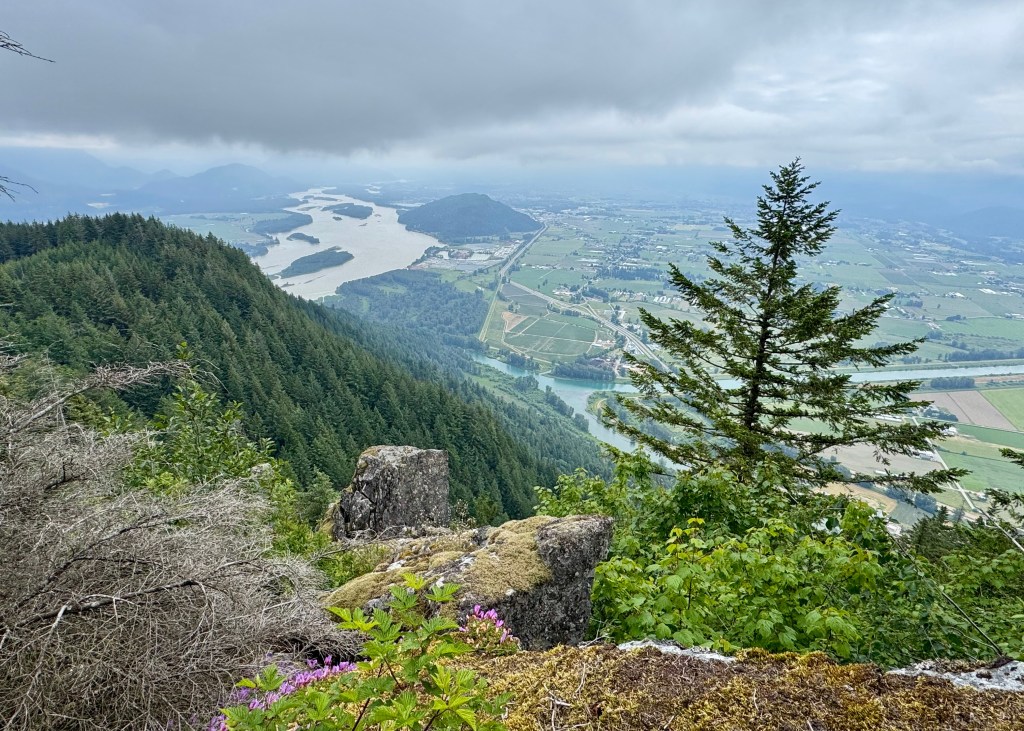
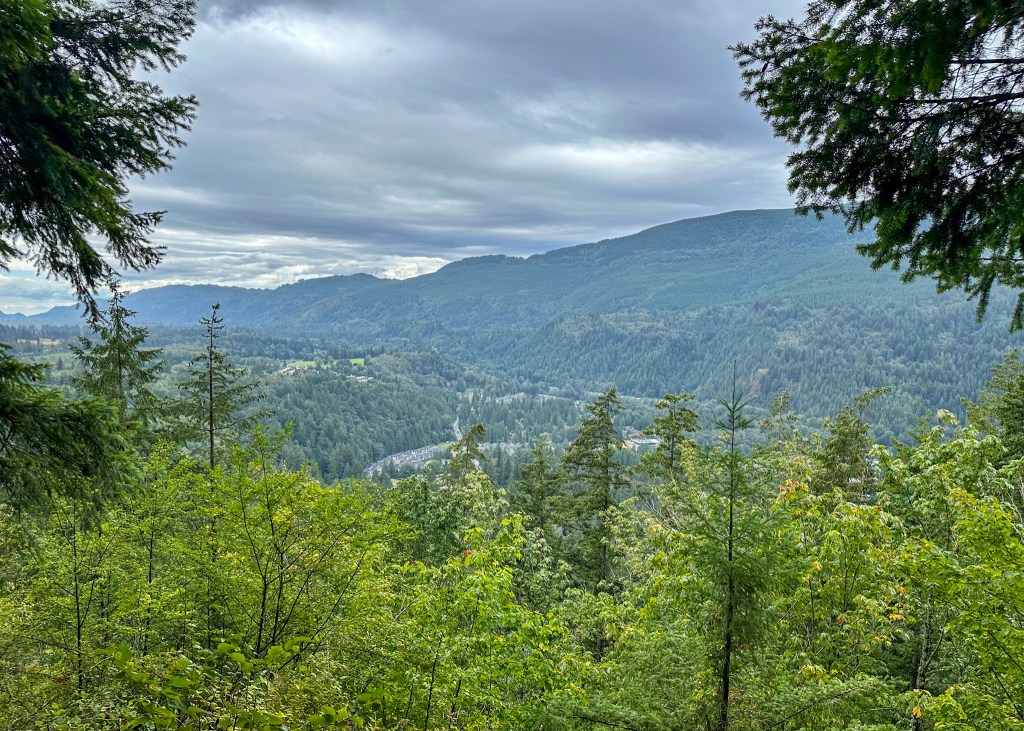
Baker Rock, Abbotsford – June 2025:
Baker Rock is a 6.3km trail located in Sumas Mountain Regional Park in Abbotsford. The trail is mostly a forest service road, except for approximately the final 1km before reaching the main view point, which provides beautiful views of the Fraser Valley. Similar to Lighthouse Park, Sumas Mountain Regional Park has several trails to choose from – we are hoping to go back this year (2026) and complete this trail again, but this time we want to stop and experience the beauty of Chadsey Lake.
Mount Thom via Thom Creek Trail, Chilliwack – July 2025:
This trail is located in Chilliwack, which as of November 2025, also happens to be home now for Justin, myself and our dogs! We spent some time exploring the Chilliwack area after completing this trail, realizing how beautiful it is in the valley, and how much the area has to offer in terms of amenities. Specifically, we went to Ambleside Coffee for a caffeine fix and baked goods, and then went to Sidekick Brewing for deep dish pizza and a cold beer after our hike. Around 5 months after this hike, we purchased our first detached home in Chilliwack – we are looking forward to exploring more of the Chilliwack trails once the weather improves!
But for now, back to telling you about Mount Thom via Thom Creek Trail. The trailhead is located in a residential area, and is almost 7km long with an elevation gain of 400m. The trail is a steady climb to the top, but fortunately is mostly tree covered, making it tolerable on a hot summer day (but you will still want to start early). At the top of the trail you will be rewarded with stunning views of the place we are now proud to call “home!”
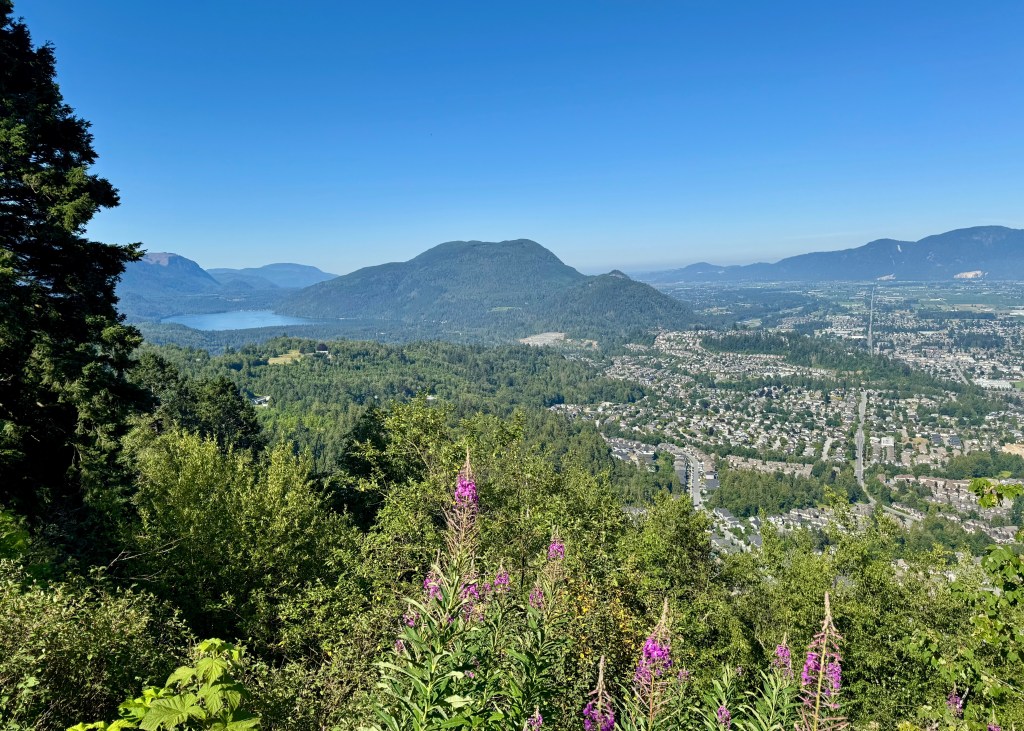
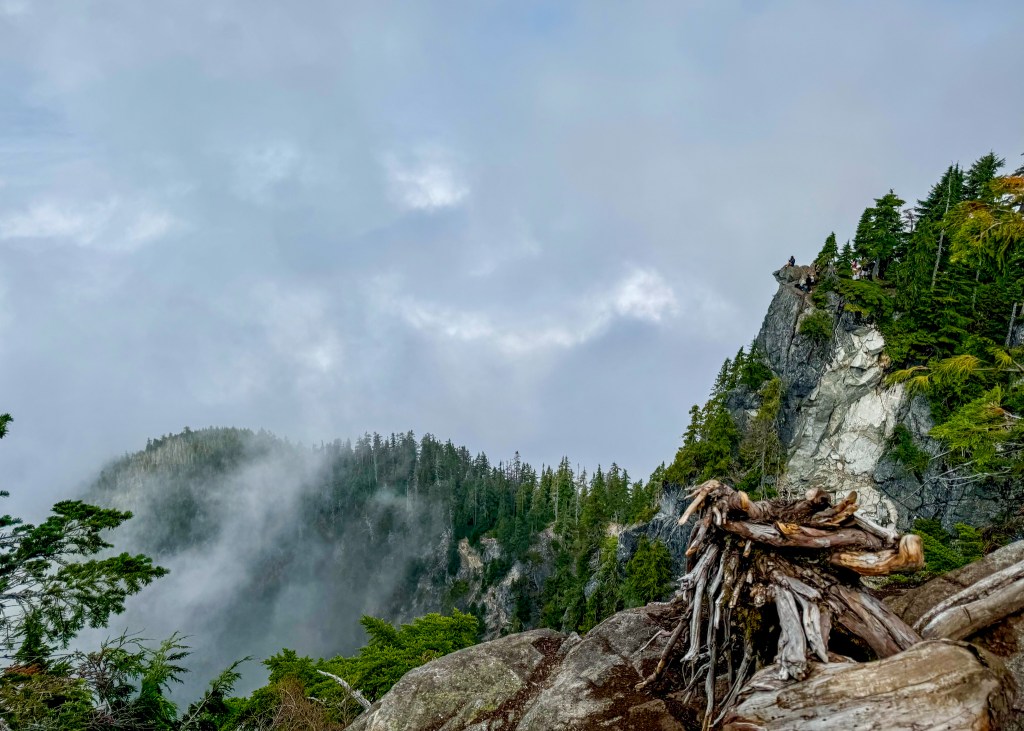
Elk Mountain, Chilliwack – July 2025:
The Elk Mountain trail is probably the hardest local hike we did in 2025. This nearly 9km out-and-back trail is also located in Chilliwack, and took us a little under 3-hours to complete.
What makes this hike challenging is the elevation gain of almost 800m. Fortunately, this hike is almost entirely in the forest, making it a good option on a warmer day or if you are starting the hiker later in the day. The trail opens up once you reach the alpine, but this is a very short portion of the trail.
Unfortunately for us, there was a lot of cloud coverage at the top of Elk Mountain, which impacted what we were able to see. Apparently, on a clear day, you are able to see other mountains along the Canadian and US border, including Mt Baker.
The most “exciting” part of this hike was that a couple hikers heading back down Elk Mountain had warned us that they saw a skunk in the alpine! While not a huge safety threat, the idea of Justin and I, or our dogs, getting sprayed by a skunk was definitely enough to keep me on high alert. Fortunately, we never saw this elusive creature, and I was able to relax during our descent ツ.
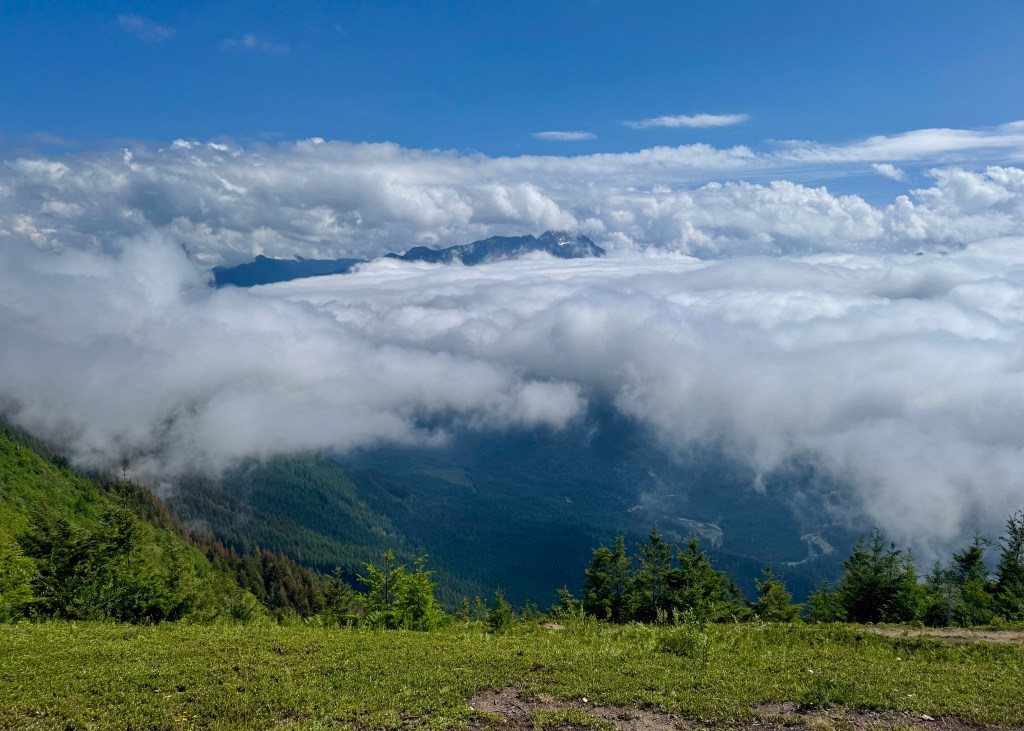
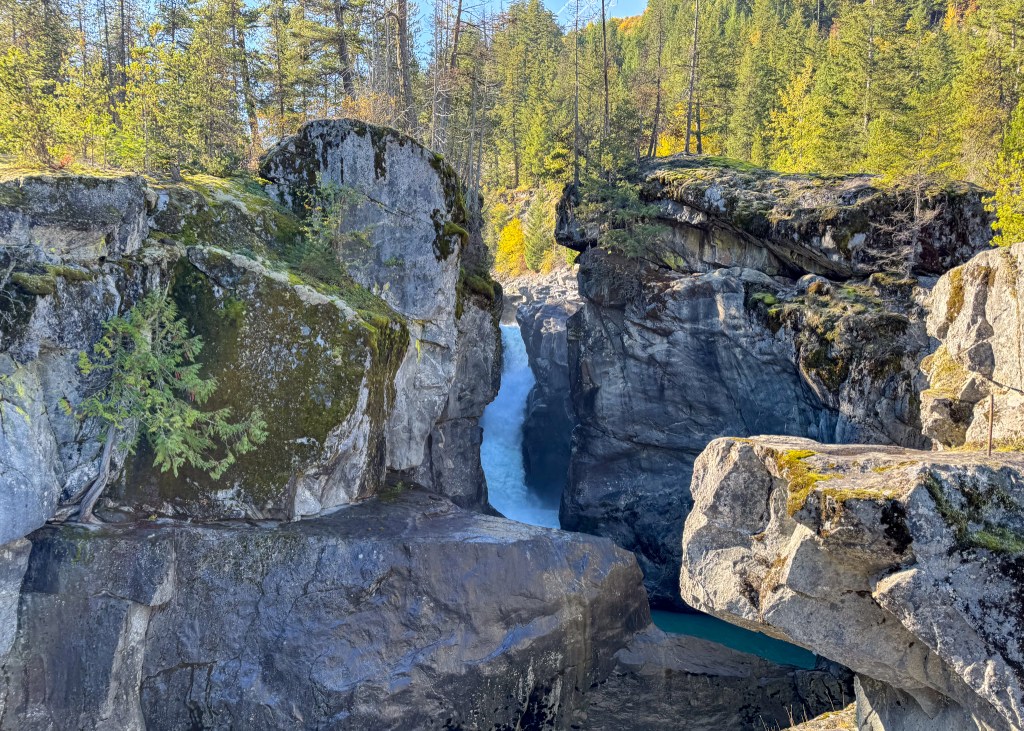
Crooked Falls, Squamish – August 2025:
The Crooked Falls trail is located in Squamish, and while not very long in length (a little over 5km), it is considered a hard hike, as it is a consistent uphill climb all the way to the Falls – you will gain over 500m in elevation over approximately 3km.
Note that the road to get to the Crooked Falls trailhead is not paved – make sure your vehicle choice is appropriate (ours definitely was not). Also, please be careful once you reach the Falls – we noticed after we completed the hike that there were flowers at the trailhead marker in honour of someone who had fallen into the Falls and passed away a couple weeks prior.

Well, on a more positive note, that is a wrap for 2025! Moving forward, 2-hours within home is going to look a bit different after relocating to Chilliwack – we are looking forward to exploring more of the Fraser Valley in 2026 ツ!
Wishing everyone a healthy, prosperous and adventure filled New Year!
Always grateful,
Michelle

Honeymooning in Kaua’i – Part 1 of 2
When I have to start a blog with “Back in [insert month],” that is when I know I have fallen behind on my posts. You might recall that the reason I started this blog was to better remember and reflect on my trips, but if I am writing posts several months later, I have probably already forgotten some details! Here is my commitment to being more timely with my posts.
Back in March, Justin and I travelled to the island of Kaua’i, Hawaii for our honeymoon. While I love to travel and explore, by the end of a trip, I usually feel like my cup is full and I am ready to go home. But at the end of this trip, I was not ready to leave and I felt we had “unfinished business” in Kaua’i. Nevertheless, we maximized the time we had, and are looking forward to a trip back in the future ツ.
Our primary reason for choosing Kaua’i for our honeymoon was because of all the amazing hiking opportunities available on the Island. In this post, I will discuss all the trails we completed in detail, and I will publish a “Part 2” that will cover our other activities, food and accommodation. I am hoping that writing shorter, more focused blogs, will also help me to publish posts more frequently ツ.
Anyway – while our trip to Kaua’i was only a week long, we managed to complete six hikes, and they are discussed below in order of completion!
Maha’ulepu Heritage Trail:
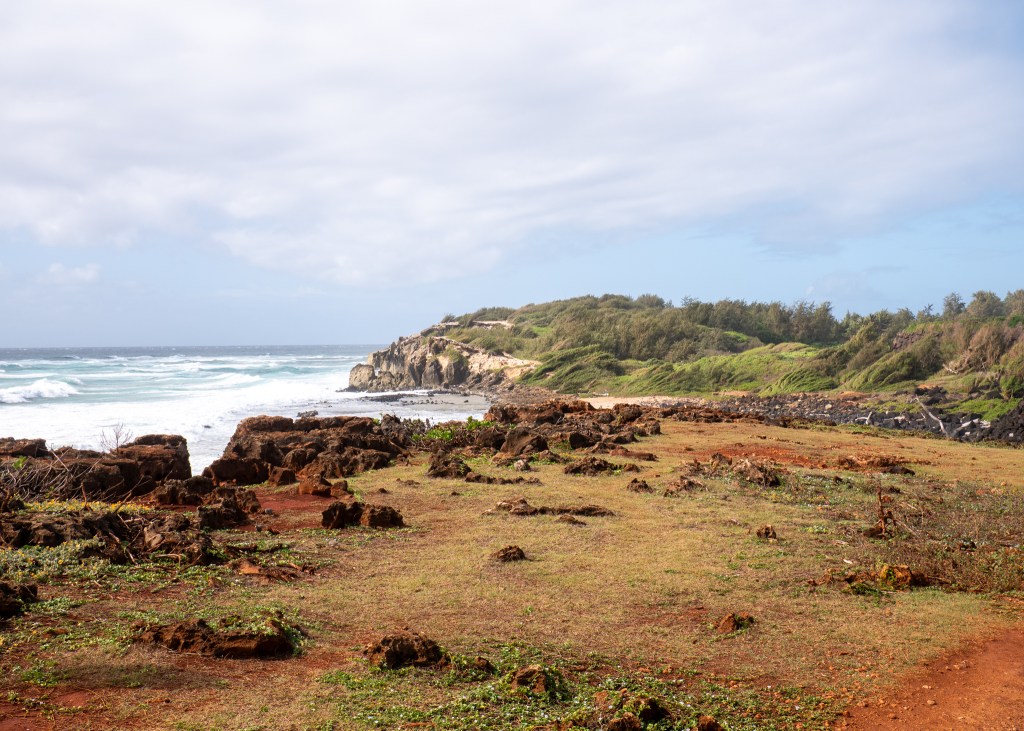
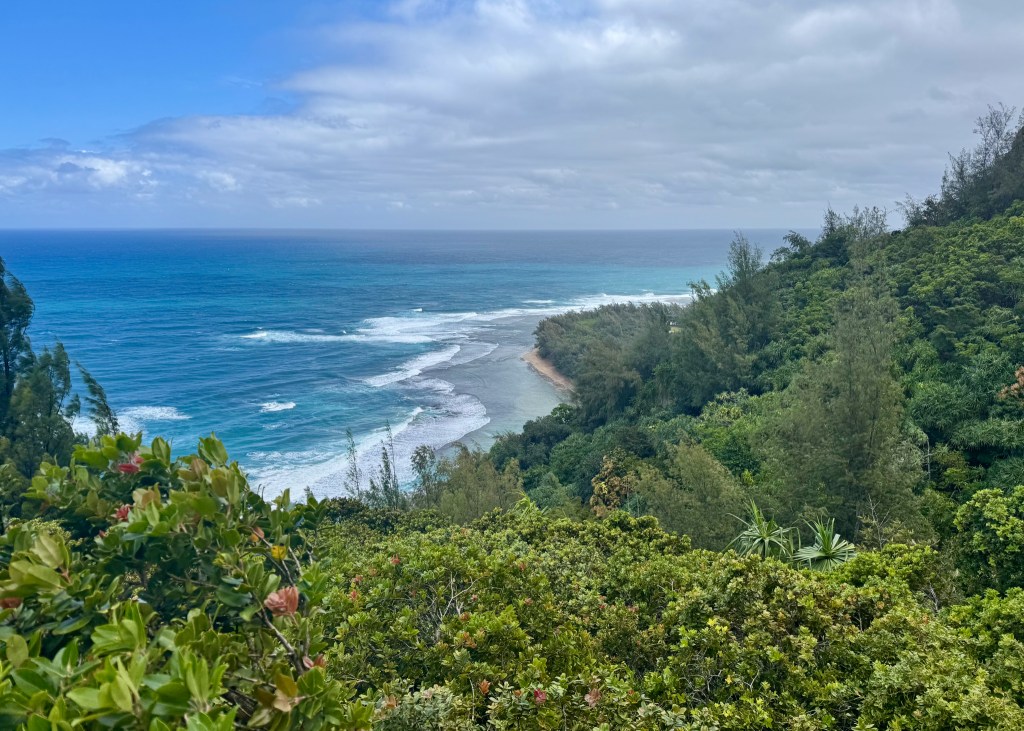
The Maha’ulepu Heritage Trail was the first hike we did in Kaua’i. This hike is classified as moderate on AllTrails – it is 6km long, and has an elevation gain of 122m. The trail is located along the southern coastline of the Island, providing beautiful views of the ocean and coastal cliffs all throughout. The trail ends at Gillin’s Beach, but you will pass several other sights along the way including Poi’pu Bay Golf Course, as well as the biggest limestone cave and fossil site in Hawai’i – Makauwahi Cave (although, we only encountered the Cave because we took a “scenic detour”). If you are looking for a fairly easy and peaceful walk near the ocean, I would definitely recommend the Maha’ulepu Heritage Trail.

Sleeping Giant (Noun Mountain) East Trail:
The Sleeping Giant East Trail was my second favourite hike that we did in Kaua’i. This hike is approximately 5km long, and it gets its name from a local legend, which tells of a “giant who feasted so much at a party in his honour that he laid down for a nap and never awoke” (as per AllTrails) – and I can verify that from a distance, the Sleeping Giant actually looks like a face! What made this hike a bit challenging was the fact that we did it right after it rained, making the trail slippery, and there is also a rock scramble near the end. However, the panoramic views from the top were worth it – we could see the nearby towns of Kapa’a and Waliua, as well as the Pacific Ocean. We found out after-the-fact that there are apparently caves you can explore right under the main viewpoint – if you end up at this trail, make sure you do not miss them like we did. But in the end, I am happy to report that we successfully completed the hike without waking the Sleeping Giant ツ.
It is also noteworthy that there are two Sleeping Giant trails – the one we completed was on the east, but there is also a west trail that is shorter – it is only 2.7km long. We did not try this option, but basic math tells me that you should be able to get to the views faster, although it will be a steeper climb over a shorter distance.
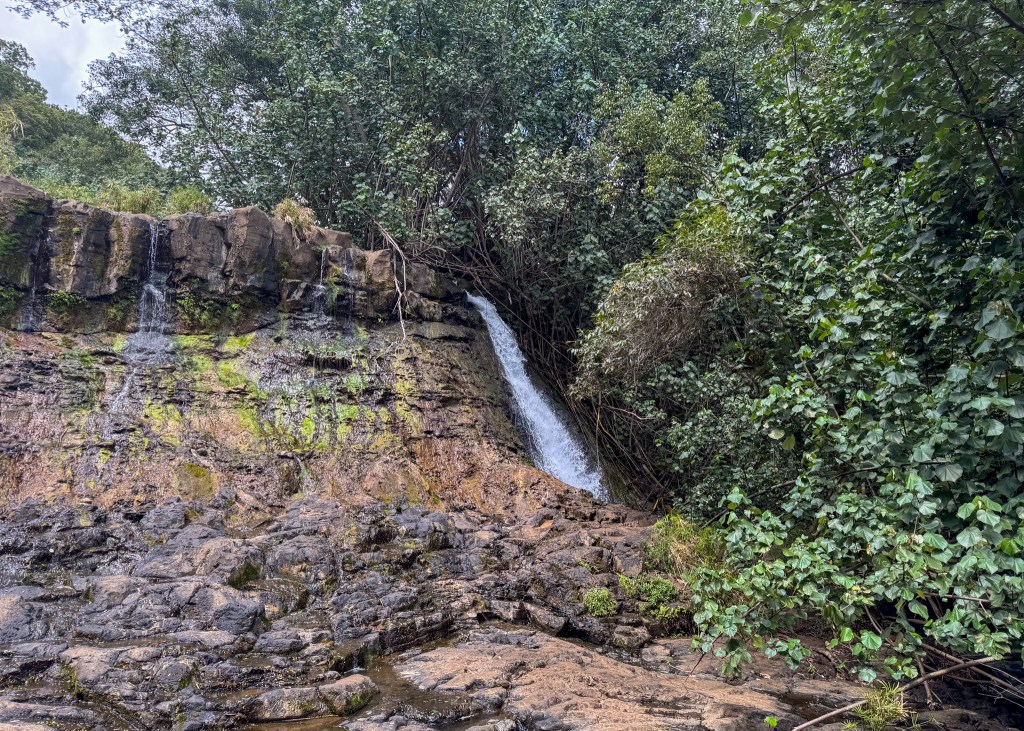
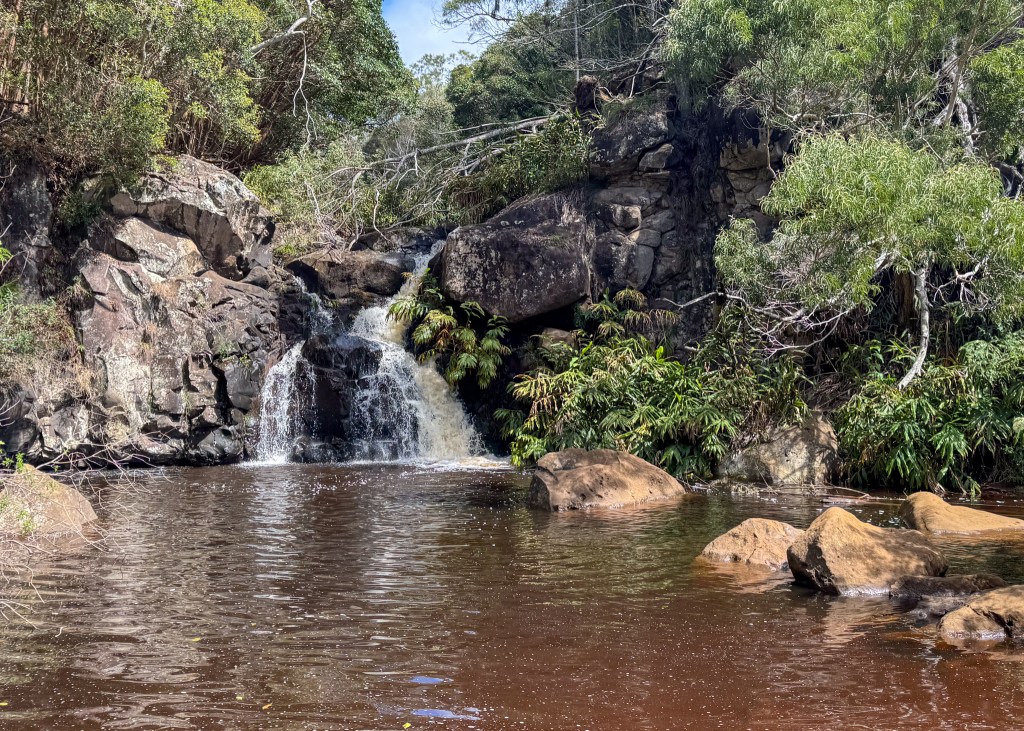
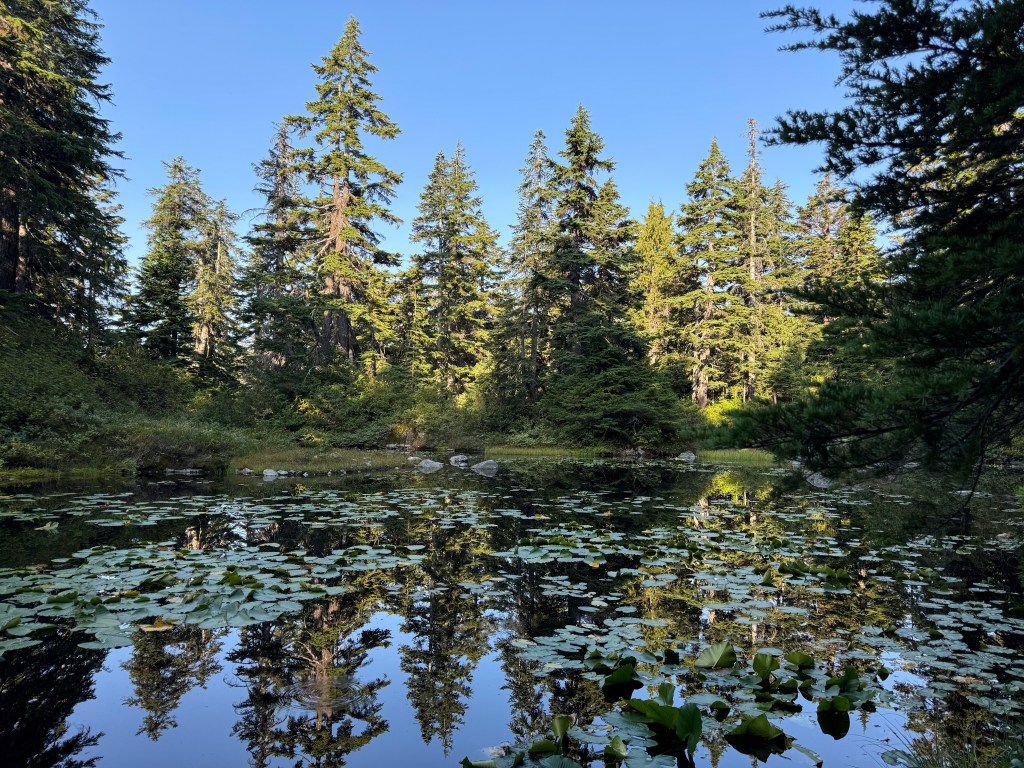
Ho’opi’i Falls Trail:
The Ho’opi’i Falls Trail is an easy walk we completed after conquering the Sleeping Giant. We felt we had some energy to keep going, but we were not looking for anything too strenuous as it was starting to get warm, and we were starting to get hungry (or “hangry” in my case ツ). This is an out-and-back trail that is mostly flat (64m elevation gain), ending at a beautiful little waterfall with a swimming hole. The hardest part of the trail was getting down to the waterfall, but there are lots of trees you can use to support your descent. This was the perfect way to end our hiking/walking activities for the day before heading back to our hotel to relax by the pool.

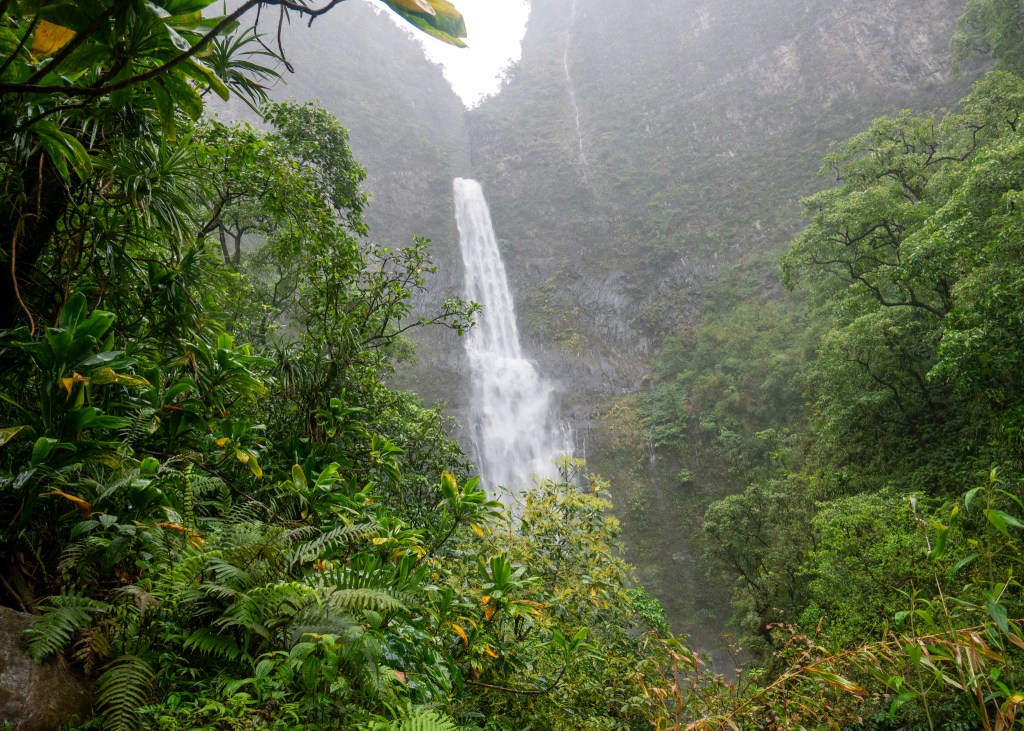
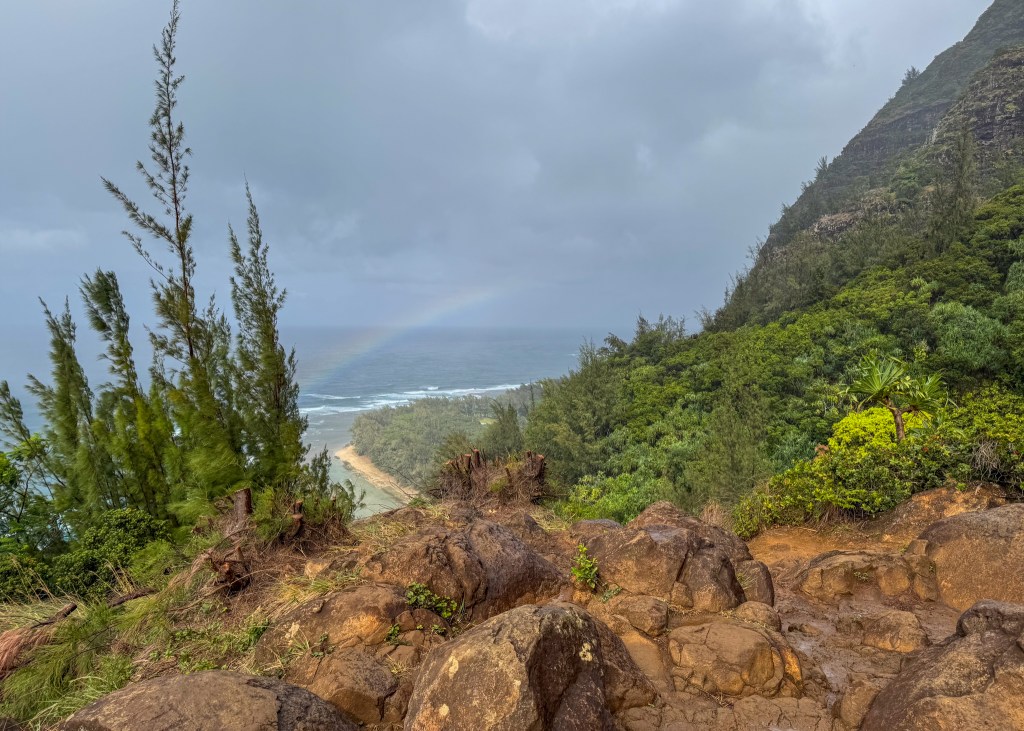
Hanakapi’ai Falls:
Hanakapi’ai Falls was my favourite hike of the trip, but was also the hardest and scariest, as well. This hike is located along the Nā Pali Coast in Haena State Park, and visitors are required to make reservations in advance. We tried making vehicle reservations on multiple occasions – staying up late as reservations are released 30-days in advance in HST – but we were not successful and had to opt for the shuttle option, instead. When we arrived at the park and saw that the parking lot had room for less than 10 vehicles, we were not surprised that we were unable to get a vehicle reservation!
Anyway, the Hanakapi’ai Falls trail is rated as hard on AllTrails, as it is 12.2km in length and has an elevation gain of 726m. Most of the elevation gain is at the start, before crossing the first stream crossing, and then a gradual incline for the remainder of the trail. When we first arrived at the trail head (via shuttle), there was a Haena State Park employee who greeted us, advising about the Hanakapi’ai Falls trail and conditions. When she told us that we would have to cross the “stream” five times before getting to the falls, I imagined a little bit of water, where the bottom of my hiking boots might get wet… but I was very wrong. In this case, the stream went part way up my thighs, and I am nearly 5’8” tall! Because it was raining, and had heavily rained during previous days, the stream was rising and moving very quickly, making it hard to get across. Luckily, we had hiking poles to help with stability and water resistance, but it was still difficult to walk through the stream, nonetheless. It was a bit funny how concerned I was about getting wet during the first crossing, but forgot all about it by the third time ツ.
The trail itself is absolutely stunning – the surrounding forest is lush with greenery, and from certain points on the trail, you can see the Nā Pali Coast. The Hanakapi’ai Waterfall, itself, is one of the most impressive waterfalls I have ever seen – the lower falls (where the trail ends) are around 300-400 ft tall, but it is estimated that the entire waterfall is over 1,600 ft! We were able to stand right at the bottom, providing for an amazing perspective of the waterfall – we could feel the mist, and some people were even swimming at the base.
While we did not go swimming at the waterfall, it was raining so hard that it looked like we had gone swimming… I was absolutely soaked, head-to-toe (and to think I bothered doing my hair that morning). It was actually very difficult to get a photo without water on the phone or camera lens. To make matters worse, I had my passport in my Lululemon belt bag which also got wet. When I got home, I had to replace my passport well before the expiry date, and I had to complete a special form which explained how my passport was damaged – lesson learned to leave my passport at my accommodation the next time I decide to hike in a rain storm!
In the end, this trail was quite the adventure – it was slippery and muddy from all the rain, and the stream was more difficult to cross than usual due to the weather conditions – but it was all worth it!
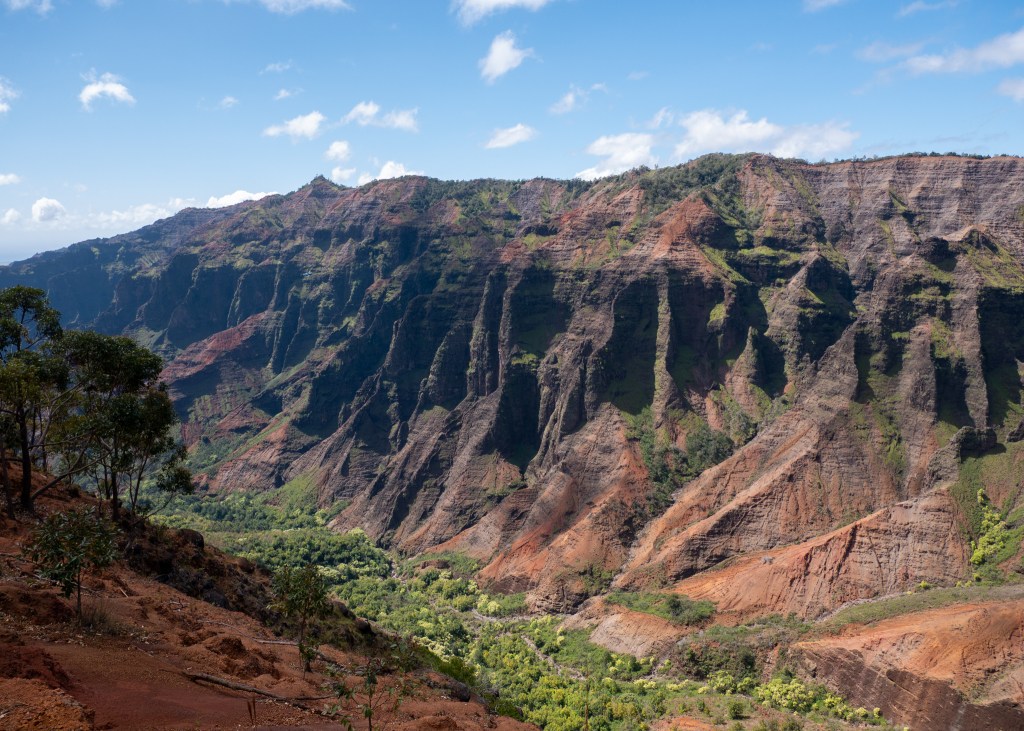
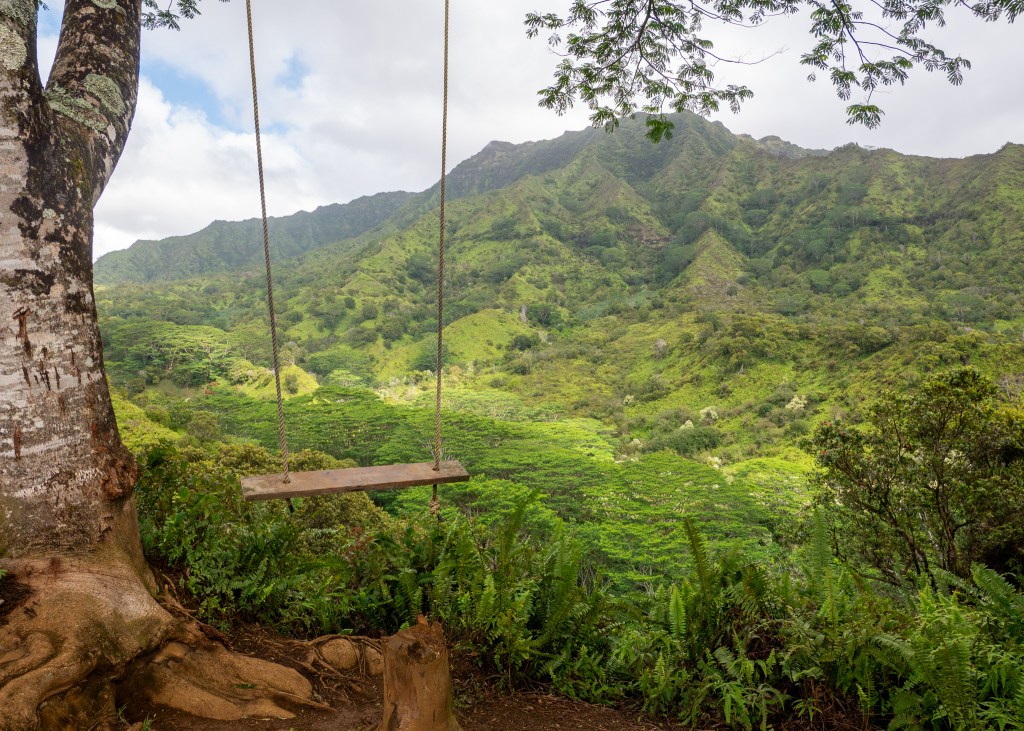
Waimea Canyon Trail to Waipo’o Falls:
This trail is located in Waimea Canyon, which is often referred to as the Grand Canyon of the Pacific. Waimea Canyon was created by a volcanic eruption over 5 million years ago, and is 13 miles long, 1.5 miles wide and 2,500 feet deep. While there are many trails to explore at Waimea Canyon, we did not have a lot of time here, as we were heading on a Nā Pali Coast Boat Tour in the early afternoon (which I will tell you about in Part 2 of this post). For this reason, we chose to do the Waipo’o Falls via Pu’u Hinahina and Canyon Trail, as it is a shorter hike – it is 4.2km long and took around 2-hours to complete.
The first part of the trail consists of walking through the forest as you descend into the canyon. I will note that there is a considerable decline on this trail, as it has an elevation gain of 342m (over 2.1km). I was happy to have a hiking pole with me, as there were also a lot of rocks and tree roots to navigate. However, once you emerge from the trees, you will not be surprised as to why Waimea Canyon is referred to as the Grand Canyon of the Pacific – it is truly an impressive sight of red and orange rock, mixed with greenery (much more colourful than the actual Grand Canyon).
I am embarrassed to say that as I am writing this blog post, I am realizing that we did not see (or look for) Waipo’o Falls during the hike. There is a small waterfall at the end of this trail, which I had mistaken for Waipo’o Falls, but it is not the 800 foot waterfall we should have seen. Consider this your warning and reminder to make sure you look for this impressive waterfall (which fortunately, we did see from a different viewpoint in the park).
Make sure to also stop by the swing on the trail (which is located before the small waterfall) for a great photo opportunity!
Moalepe Trail:
The final hike we did in Kaua’i was the Moalepe Trail. Similar to Ho’opi’i Falls, this hike made for a leisurely afternoon walk. The trail is 8km long, and took us around 2-hours to complete.
I will be honest, the first part of the trail is not very exciting – you will walk along a dirt path for approximately 45-minutes without a single view in sight. However, stick to it because around the half way mark (2.5km into the trail), you will encounter a swing (yes, another one) with incredible valley views – a luscious, green canopy of trees. The swing is actually difficult to get onto, as it is quite high – Justin had to hold the swing in place for me, while I climbed onto a nearby stump to pull myself up! But, the struggle to get on was worth it – it was a great photo opportunity, especially with the scenery behind me.
The views at the swing were definitely the highlight of the trail. If you are short on time, you could easily turn around and head back from here. The remainder of the trail is not well maintained – we would recommend wearing long pants as there is a section of “bush whacking” on the trail. Also, the end of the Moalepe Trail connects to another popular trail in the area called Kuilau Ridge Trail. We decided to briefly venture down the Kuilau Ridge Trail (which transition at the bridge), and came across another nice valley view, but it was not as nice as the view from the swing. The more I think about it, the more I would recommend to turn around after you reach the swing to make the most of your time ツ.
Well, I think that covers all the hikes we did in Kaua’i. Which one(s) would you try if you decide to visit this beautiful island? Make sure to keep an eye out for Part 2 of this blog post, which I hope to publish very soon!
Always grateful,
Michelle

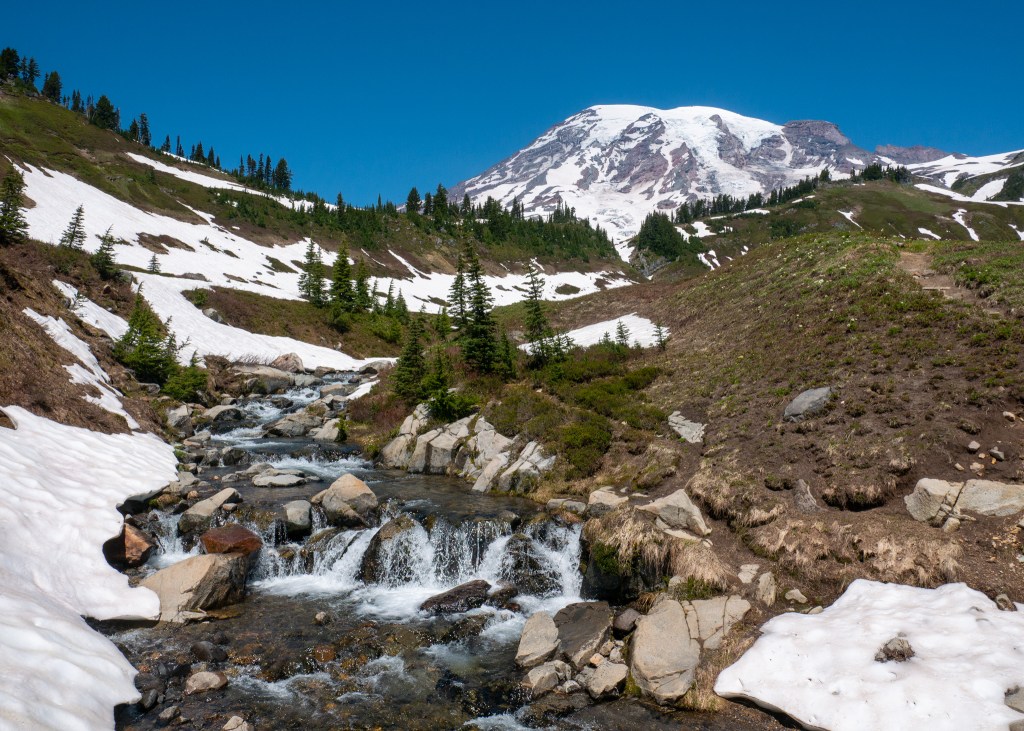
A Quick Visit to Mount Rainier
It has been a busy few months – it is hard to believe that 2025 is now half over! Does anyone else feel like this year is flying by, or is it just me?
But in all seriousness, between local hikes and adventures, as well as trips to the United Stated, Europe and Galiano Island, I have a lot to write about. But, I am going to start with our most recent trip to Mount Rainier National Park as it is currently fresh in my head!
Our trip to Mount Rainier National Park was booked pretty last minute – we had some extra time off from work, and found accommodation available near the park entrance… so we went for it!
The drive from our home to Ashford, Washington was about five hours long. This included our wait time at the border, and we also made a couple of stops along the way, one of them being our mandatory stop at Trader Joes (in Bellevue). If you have read my other blog posts, you will know that all of our trips to the United States involve a visit (or multiple visits) to Trader Joes. Here, we picked up a couple of premade meals, along with snacks and all the fixings for making sandwiches.
Our accommodation in Ashford was a cute, small cabin located just 9-minutes from Mount Rainier’s Nisqually Entrance. We arrived here on Saturday afternoon around 2:30pm, quickly dropped-off all our stuff and changed before heading off to the park.
For our first partial day in the park, we decided to do the Comet Falls via Van Trump Trail. This trail is located about 30-minutes past the park entrance. I will note that because we were entering the park quite late in the day (3:00pm), there was only a small line-up of cars in front of us.
The drive towards the trail was down a windy road, mostly in a forested area, and there are no views of Mount Rainier, itself, from this part of the park. Speaking of Mount Rainier, it was not until after we arrived at the park that I learned Mount Rainier is an active volcano – it is a bit scary to think about! But, I digress…
While our research warned us that the parking lot for Comet Falls was small, we did not realize just how few spots would be available! The pull-out on the side of the road has room for around 15 vehicles, which were all taken when we arrived, forcing us to park on the side of the road. Pro tip: If you find yourself in a situation where you need to park on the road, make sure your tires are behind the white line, otherwise you will receive a violation notice. We saw many vehicles with orange tickets stuck to their window!
Anyway, after parking, changing into our hiking shoes, and grabbing our backpacks and hiking poles, it was time to start the trail. The Comet Falls via Van Trump Trail is rated hard on AllTrails – it is about 5.6km in length, and apparently has an elevation gain of 392m. However, my activity for this trail in the AllTrails application indicated that I completed 549m in elevation gain – I do not know which one is correct… let’s split the difference! Either way though, I agree with this rating – the trail is difficult as it has a steady incline all the way to the main falls. There are very few flat areas on the trail, and there are also a lot of rocks and tree roots to navigate.
However, do not let this rating deter you – the views are all worth it!
Soon after starting the trail (while you are still near the main road), you will be rewarded with views of Christine Falls, which is a much smaller waterfall compared to Comet Falls. After this, you will enjoy a peaceful walk through the forest before reaching a rocky opening on the trail. I found this to be the most difficult part of the trail, mostly due to the uneven ground, the heat (since there is no shade), and there was also a tree that had fallen onto the trail that you have to climb over or under. But, we persevered!
After the rocky opening, you will once again enter the forest, and after a series of small switchbacks, you will turn the corner and be greeted by Comet Falls.
One word: Wow. This was probably my favourite view of the Falls – nestled amongst the mountains and trees, with the water flowing through the valley.
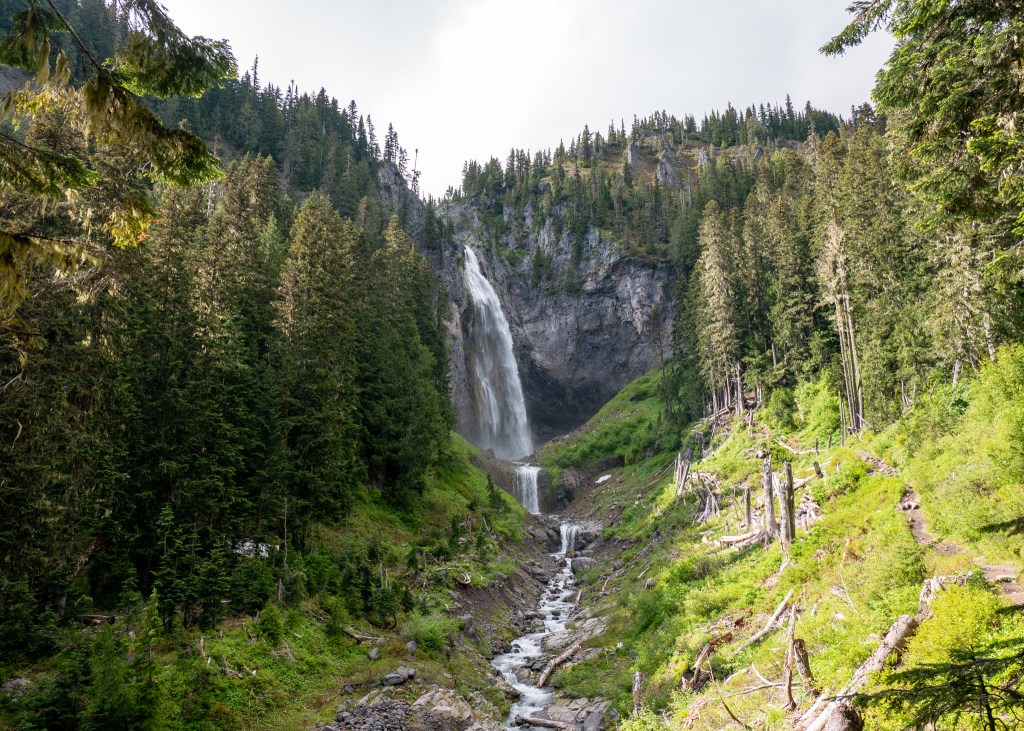
After taking in the Falls from this view point, we continued along the trail to the very end, where we got close and personal with it – I could feel the water spraying me, which was actually very refreshing!
Given that it was quite late in the day by the time we finished the Comet Falls trail, we decided to head back to our accommodation and eat, before heading to bed – we were getting up early the next day to do the Skyline Loop.
According to AllTrails, the Skyline Loop is the number one trail in the park. This hike is 9km long, and has an elevation gain of 542m. The trail took us a total of 4-hours and 20-minutes to complete, including the many stops we took to eat and take photos, but our actual walking time was 3-hours and 15-minutes, which is very comparable to the AllTrails estimate.
Our research indicated that the parking lot near the Skyline Loop trailhead fills-up quickly. For this reason, we left our Airbnb at 6:45am, and arrived at the parking lot around 7:30am, and by this time, the lot was nearly half full! The Jackson Visitor Centre is also located near the trailhead, but take note that there is a separate parking lot for hikers – the Visitor Centre parking has a limit of 2-hours.
The Skyline Loop starts off on paved concrete, which made me think we were getting off to an easy start. But do not be fooled – while the path might be paved, there is an immediate incline. This, combined with the fact that the trailhead starts at 5400ft above sea level, made for a difficult start to this hike. I have noticed a couple of times now from our trips to other National Parks that I have difficulty breathing (while hiking) at higher elevations. Is it just me?
Anyway, it was not long before we were unable to see the concrete beneath us – we encountered snow, and lots of it! Even though it was late June, our visit to Mount Rainier was still considered to be the shoulder season. And, given the high elevation, it was no surprise that the trail was still predominantly covered in snow. Fortunately, we came prepared with crampons and hiking poles. I would not have been successful on this trail without these items – we saw many people slipping and sliding in the snow.
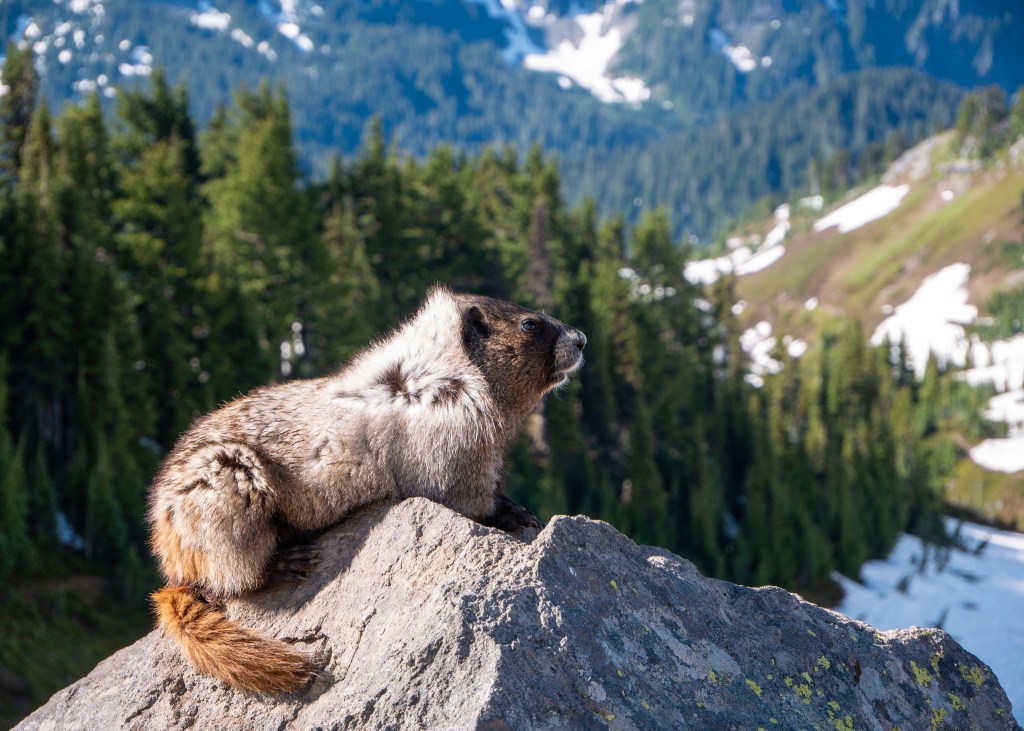
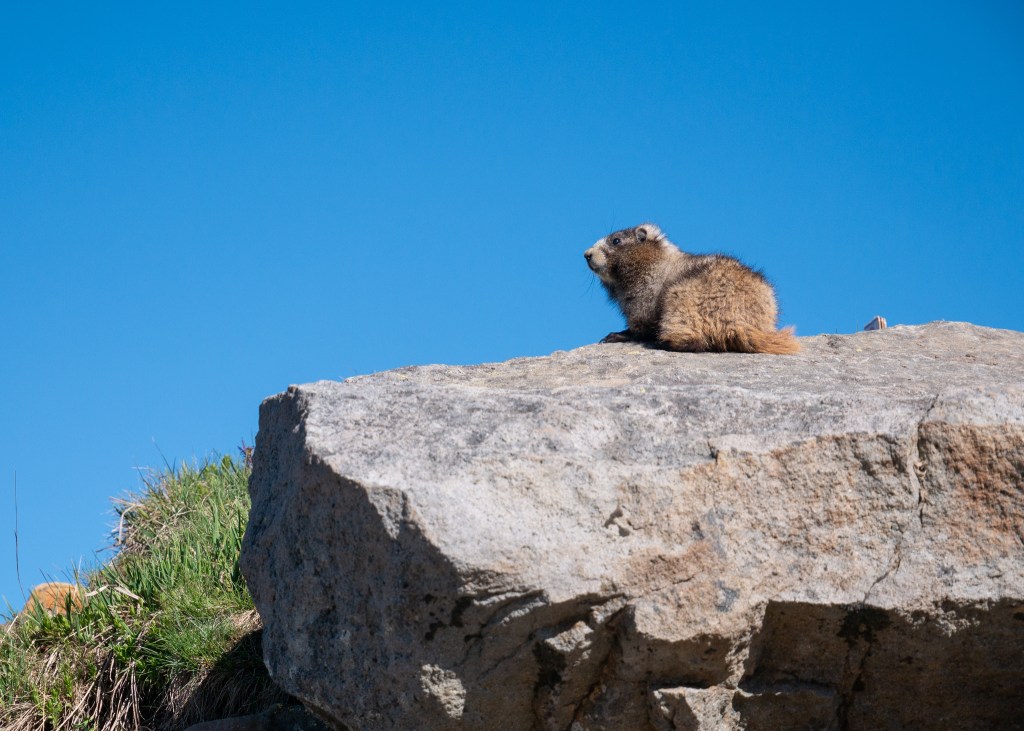
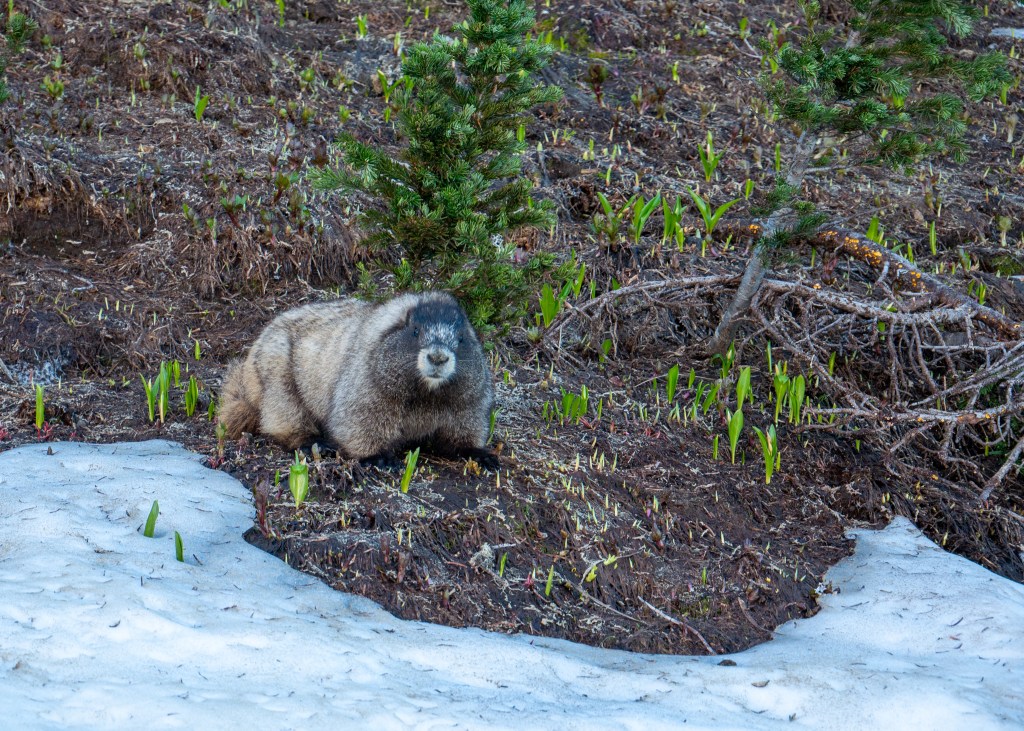
Shortly after we started the trail, we came across marmots! A couple of them were sunbathing on the rocks, while others were looking for food. We actually saw marmots multiple times throughout the hike. Our favourite encounter was when we saw them “in action.” I say it like this because it was not clear to us if they were playing, or fighting – but either way, it was very entertaining to watch. At one point, one of the marmots stopped playing/fighting, laid down and did not move for several minutes – we got a bit concerned. But not long after, we noticed the marmot had moved, and was making a mad dash across the snow-covered hills!
Some hikers we talked to on the trail apparently also saw a bear, but we did not see any other wildlife aside from marmots and a couple of deer at the other end of the trail.
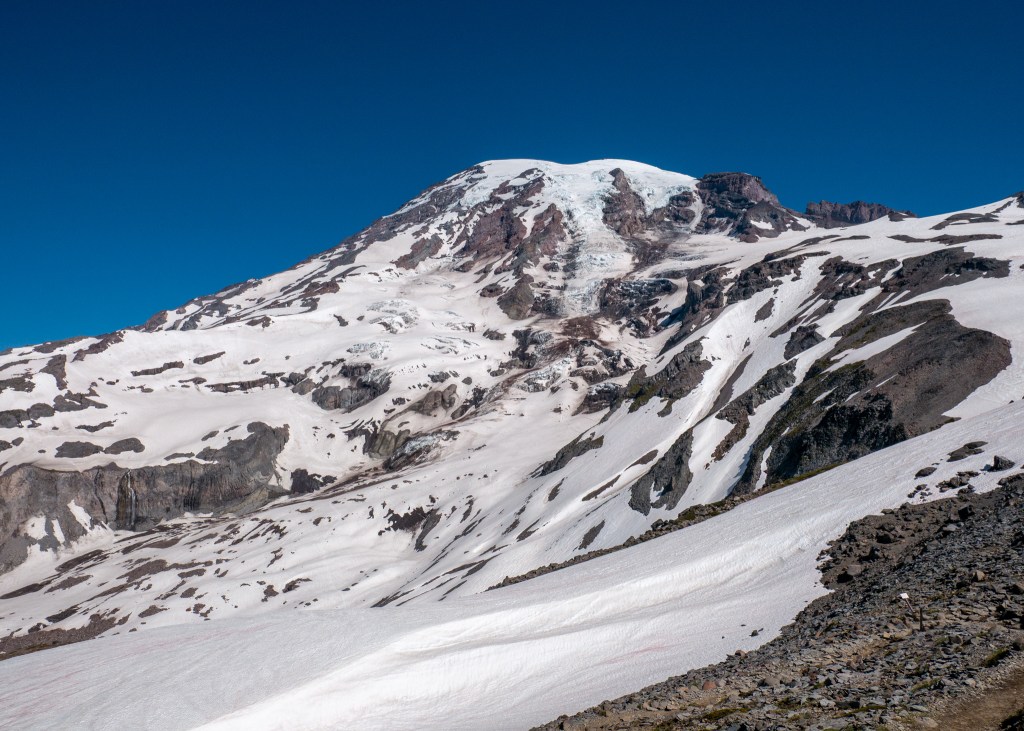
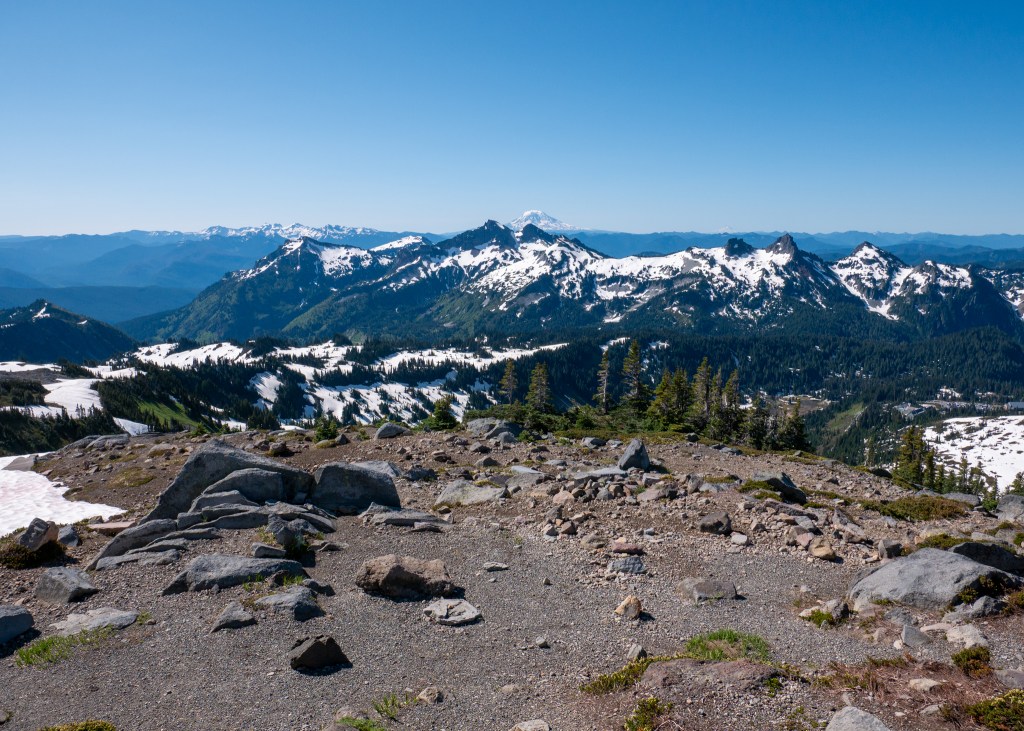
The views along the trail, especially of Mount Rainier, were absolutely stunning. I found myself stopping to take photos every few minutes – which definitely contributed to the extra hour of our non-hiking walking time. There were also amazing views of other nearby mountains along the trail – Mount St. Helens, Mount Adams and even Mount Hood which is located in Oregon. The best views of these three neighbouring mountains was from Panorama Point, which is located around 3km from the start of the trailhead.
By far, the trickiest part of the trail was going downhill. Downhill is difficult enough on its own, but the soft, partially melted snow added another element of challenge. While crampons and hiking poles were helpful in this situation, I still went down once, and also had many other close calls. Some hikers resorted to sliding down the bigger hills – while it looked like fun, it is not something I was willing to try!
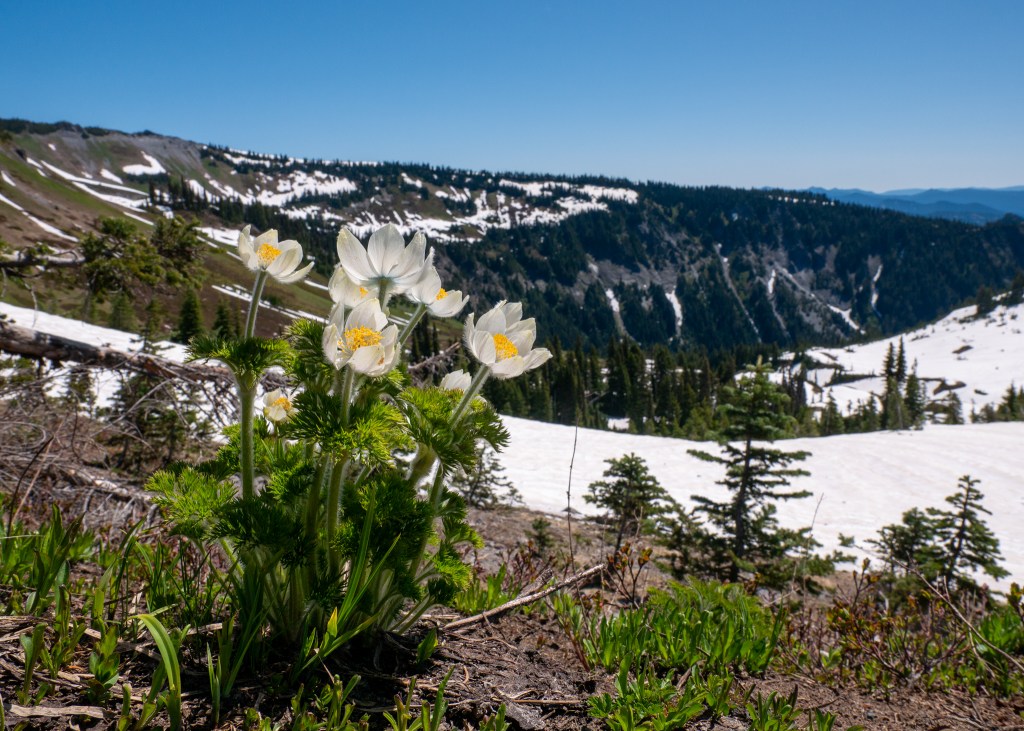
While navigating the snow provided for extra challenges, we encountered a couple Mount Rainier volunteers on the trail who educated us on the importance of hiking in the snow, and not being tempted to step into the meadows where the snow had already melted, as this is damaging to the plants trying to recover after a long, cold winter. We were even lucky enough to see some wildflowers starting to bloom!
Mountain views, marmots and wildflowers were not the only sights that the Skyline Loop offered – we also passed several water streams during the hike and saw another waterfall – Myrtle Falls – near the end of the trail. The waterfall area is very busy, as many visitors will start the Skyline Loop trail in the opposite direction, and some will even turn around after Myrtle Falls, as it is located only a short walk from the Visitor Centre.
Overall, we very much enjoyed this hike – it is not surprising that the Skyline Loop Trail is considered the top hike in Mount Rainier National Park – we were surrounded by beautiful sights of nature and 360 degree mountain views for a little over 4-hours – what else can you ask for?
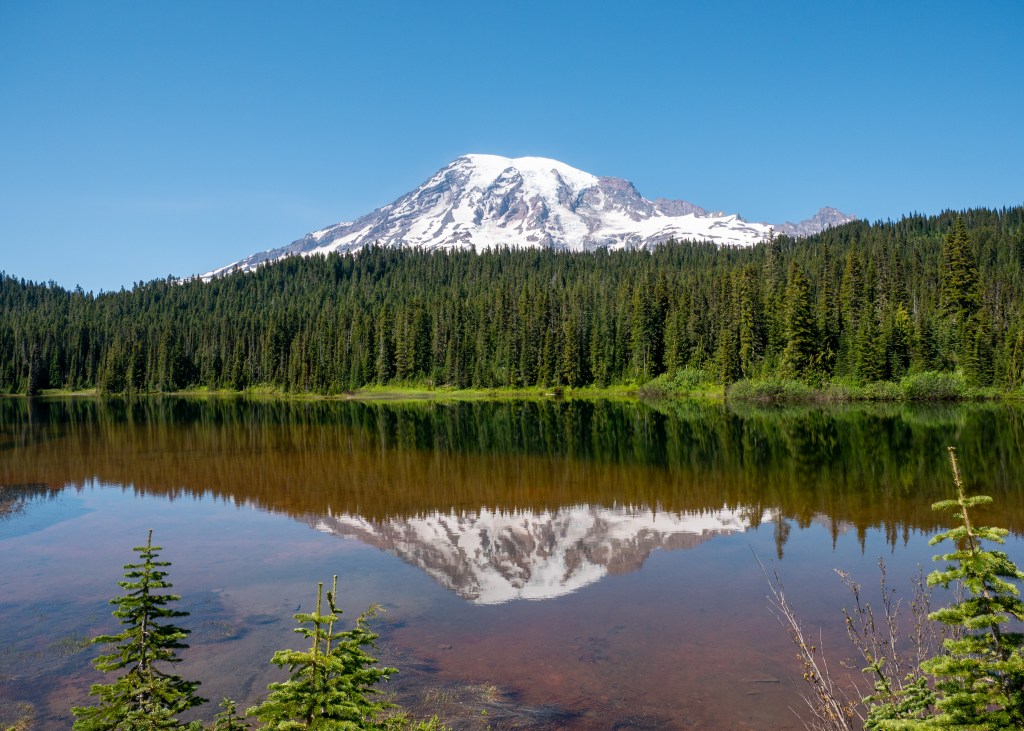
After completing the Skyline Loop Trail, we had lunch and grabbed a couple of souvenirs from the Visitor Centre (a colour poster with marmots, obviously ツ, and a magnet) before making our way to Reflection Lake. The Lake is appropriately named, as you are able to see a reflection of Mount Rainier in the water. It was stunning!
From here, we somehow found the energy to take on one more short, easy hike called the Bench and Snow Lakes Trail. This trail is 3.5km in length, has an elevation gain of 139m, and AllTrails suggests that it takes around an hour to complete.
As the name suggests, you will encounter two lakes along this trail, starting with Bench Lake. This was a beautiful lake, providing more views of Mount Rainier, because let’s face it, you cannot get tired of this sight. However, we preferred the views at Snow Lake, but only because it provided us with something new to see.

While walking towards Snow Lake, you will encounter a fork on the trail, and there will be a sign that indicates the direction for the camp sites – go left at the fork towards the campsites, as this area provides better views (in my opinion) of Snow Lake. My favourite vantage point was actually along the log that you need to cross to get to the camping area – the logs in the lake provided some beautiful foreground for photos, as we took in the sights of Snow Lake.
While the lakes were beautiful, the biggest downside to this trail was the bugs. While I did not think that the bugs were landing on me, they were just flying near me, I was wrong – I ended up with 7 new bites from this hike! I think they were mosquito bites, but I cannot be certain. Make sure to put on bug spray or wear loose clothing if you attempt this hike.
After completing the Bench and Snow Lakes Trail, we decided we were done with hiking for the day and started to make our way back to Ashford. Before going back to our Airbnb, we stopped at Rainier Basecamp Bar & Grill for a refreshing beverage – this was a cool spot to enjoy a drink after a long day of exploring, as it had great vibes and a massive patio, but they clearly had a busy day as they ran out of certain items on the menu!
Overall, we really enjoyed our short visit to Mount Rainier National Park, and look forward to returning one day to explore more areas of this beautiful landscape.
Always grateful,
Michelle

The Desert Called, and I Answered… Again (California & Nevada – Part 1 of 2)
After writing several posts about our previous visits to Indio, California, it is starting to become difficult to come up with creative titles for my blogs – how did I do ツ? Subpar blog names aside, our last trip to the desert was in November 2024, and there was definitely no shortage of places to see and things to do during our visit, despite having already spent a lot of time in this area.
We spent the first part of our trip in Indio, before heading to Las Vegas, which provided us with easier access to Death Valley National Park, as well as Grand Canyon West.
Before I get started, a quick note for my email subscribers – did you know that when a blog post is emailed to you, you can click on the title, and you will get redirected to read the post on my website? This will allow you to see the cover photo I have set for each blog!
Indio, California
As you probably already know by now, one of our favourite things to do is hike, and during our most recent visit to Indio, we came across some great new (new to us) hikes to explore:
- Bump and Grind Trail: The Bump and Grind Trail is a very popular trail for hiking, trail running and apparently mountain biking (although, we did not see any mountain bikes during our visit) located right near the city in Palm Dessert. About halfway through the loop, there is a “detour” that takes you to the highest point on the trail. If the gates are open, we would definitely recommend completing this additional portion of the hike – it provides beautiful views of the city and desert landscape. We also noticed (after-the-fact) that some reviews on AllTrails suggest doing the hike clockwise; however, we missed this detail and did the hike counter-clockwise. This made the downhill portion near the end a bit challenging – the trail was narrow, and there was loose rock and gravel. Learn from our mistake – go clockwise!
- Ladder Canyon and Painted Canyon Trail: This was my favourite hike that we did near Indio! The start of the trail head is around 45-minutes from Indio, and requires driving down a dusty, gravel road. Part way down this road, you will encounter an abandoned trailer – if you see this, you are going the right way! As the name suggests, there are several rickety, old ladders that you will need to climb to navigate your way through the canyon. The recommendations on AllTrails (we paid attention this time ツ) suggest going clockwise to ensure you are going up most of the ladders, rather than down. We would also suggest downloading a map of the trail, as it is very easy to miss the first ladder; and, make sure to download it well in advance, as there is no service on the trail itself – I believe we lost service at the start of the gravel road. What I loved most about this trail was the diversity that it offered – you start by going up several ladders through a narrow slot canyon, before emerging onto a ridge that provides panoramic views of the surrounding desert mountains. After the ridge, you will descend back into the canyon to complete the hike, except the way back is along a much wider path (surrounded by colourful canyon rock), compared to the narrow slot canyon at the start of the hike. There is definitely no shortage of beautiful sights at the Ladder Canyon and Painted Canyon Trail.

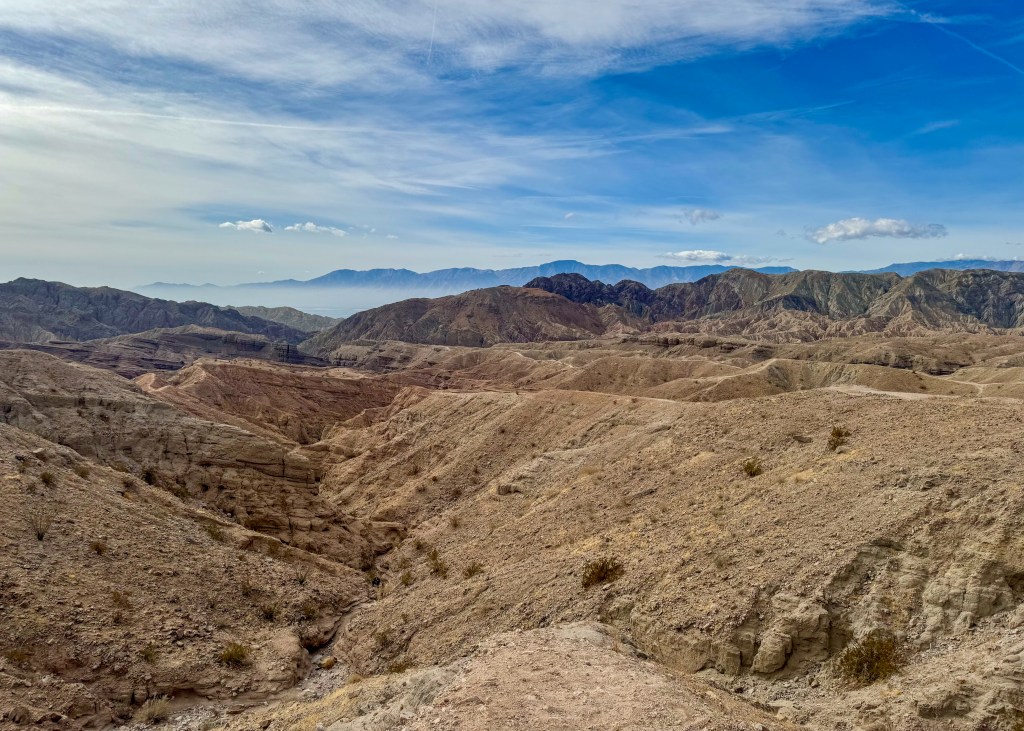
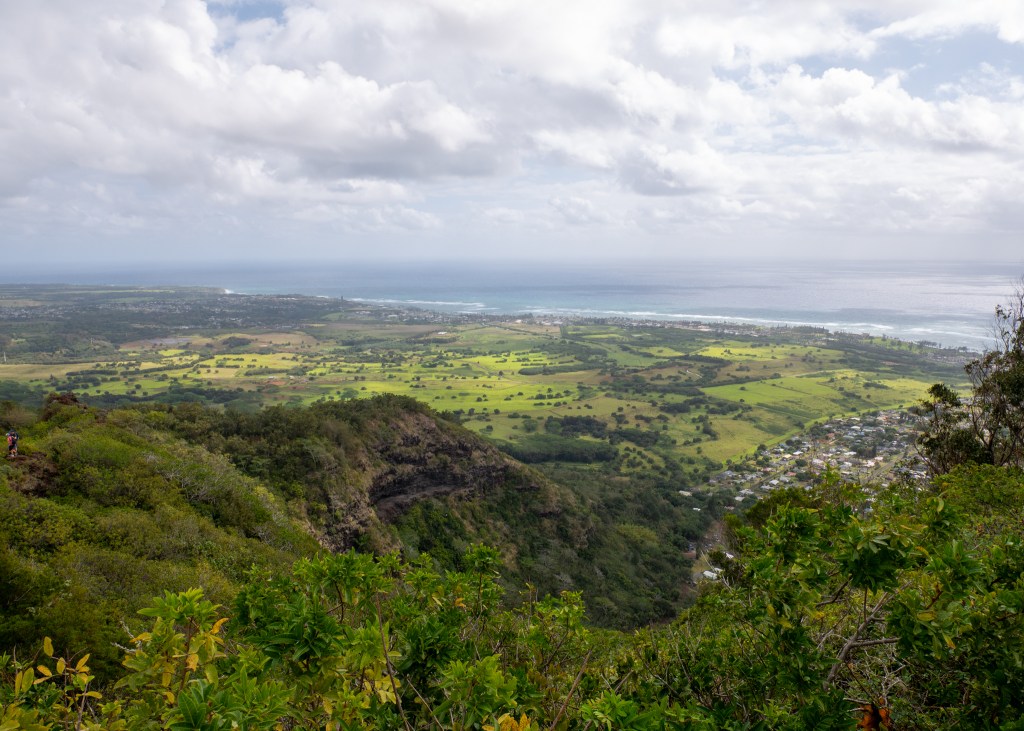
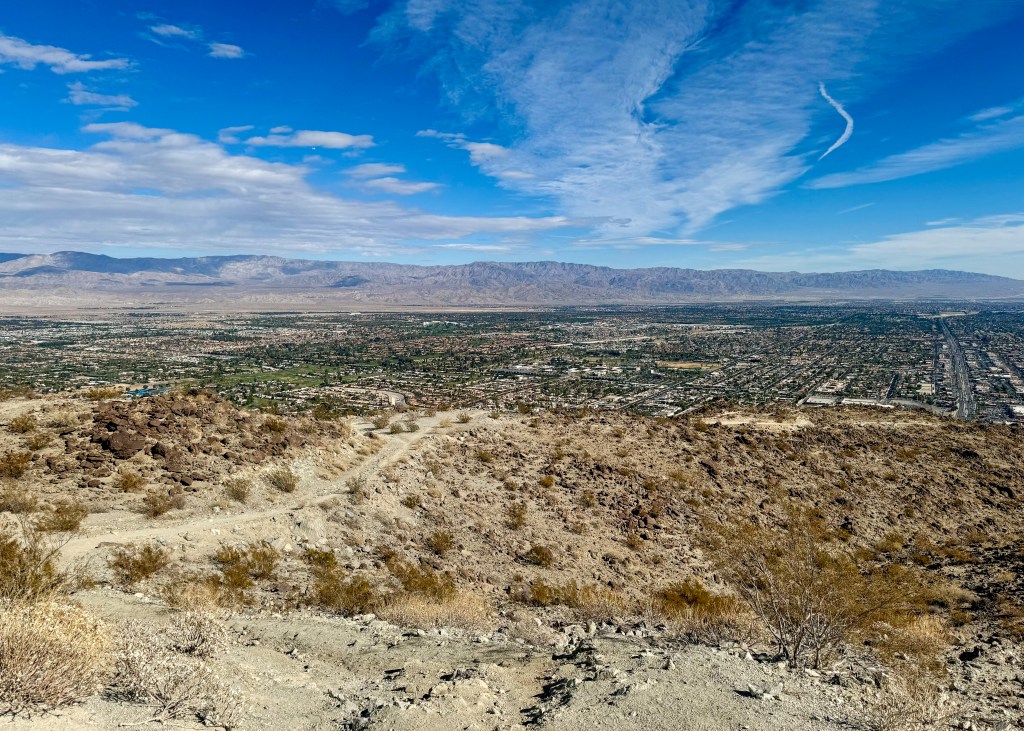
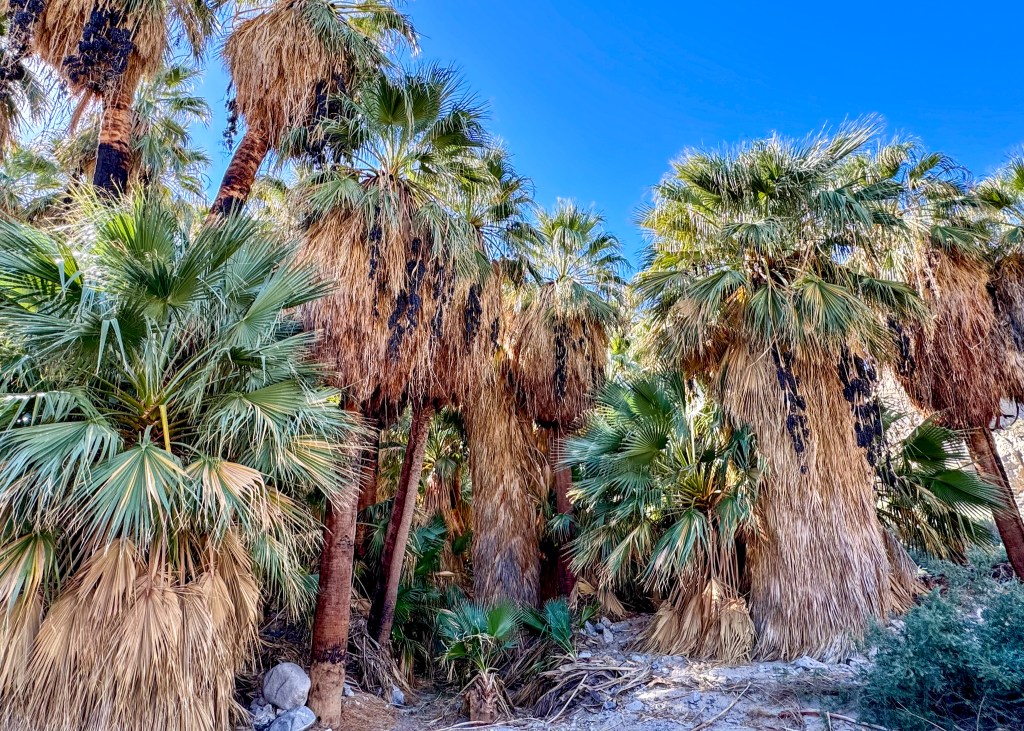
- Pushwalla Palms Loop: The Pushwalla Palms Loop starts off as a flat trail, but you quickly approach a hill that takes you onto a ridge, overlooking multiple different cities within the Palm Desert vicinity. After walking along the ridge (as seen in this blog’s cover photo), you will descend into a grove of palm trees, aka the Pushwalla Palms. This is the only part of the trail where you will find shade, and there was even a small water stream running between the trees. There was also a lot (and I mean a lot) of droppings from desert big horn sheep amongst the Pushwalla Palms. Fortunately, we did not run into a herd of sheep during our hike – you may recall how spooked I was by the big horn sheep that were watching me in Jasper. After walking through the palm trees, you will go up a rock scramble to begin your return to the trailhead. There are two ways to get back – you can either go back along the same ridge you used to reach the Pushwalla Palms, or you can walk below the ridge. We accidentally opted for the latter (we missed the path back onto the ridge), but would definitely recommend taking the ridge back for better views of the surrounding landscape. The Pushwalla Palms Loop was very different from the first two hikes we did, and we very much enjoyed it!
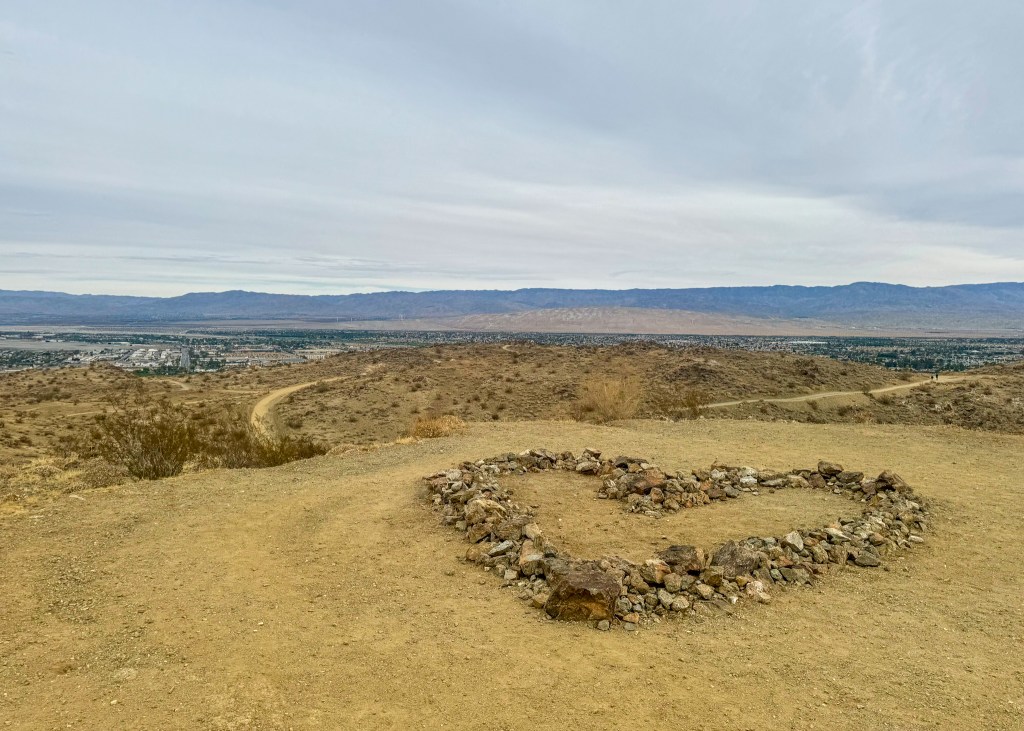
- Jane’s Hoffbrau Oasis Trail: The last hike we completed while staying in Indio was Jane’s Hoffbrau Oasis Trail. The main reason I wanted to do this trail is because the photos on AllTrails showed a heart “structure” made out of rocks that I wanted to see – it was super cute! Similar to the Pushwalla Palms Loop, Jane’s Hoffbrau Oasis Trail also leads you into a grove of palm trees. However, the grove of palm trees at Pushwalla Palms appeared much bigger and healthier than the ones at Jane’s Hoffbrau Oasis Trail. There are so many different trails in this area that you can essentially “build your own adventure” and see where it takes you! If you are looking for a slightly easier trail to do closer to the city centre, then this one is a great option.
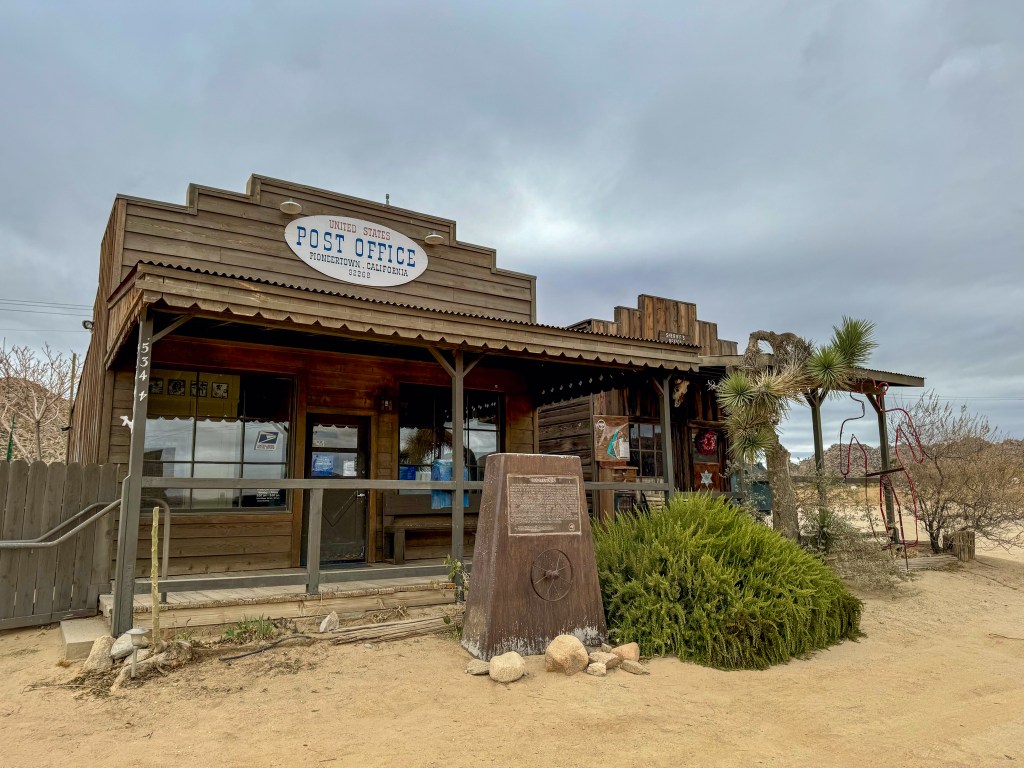
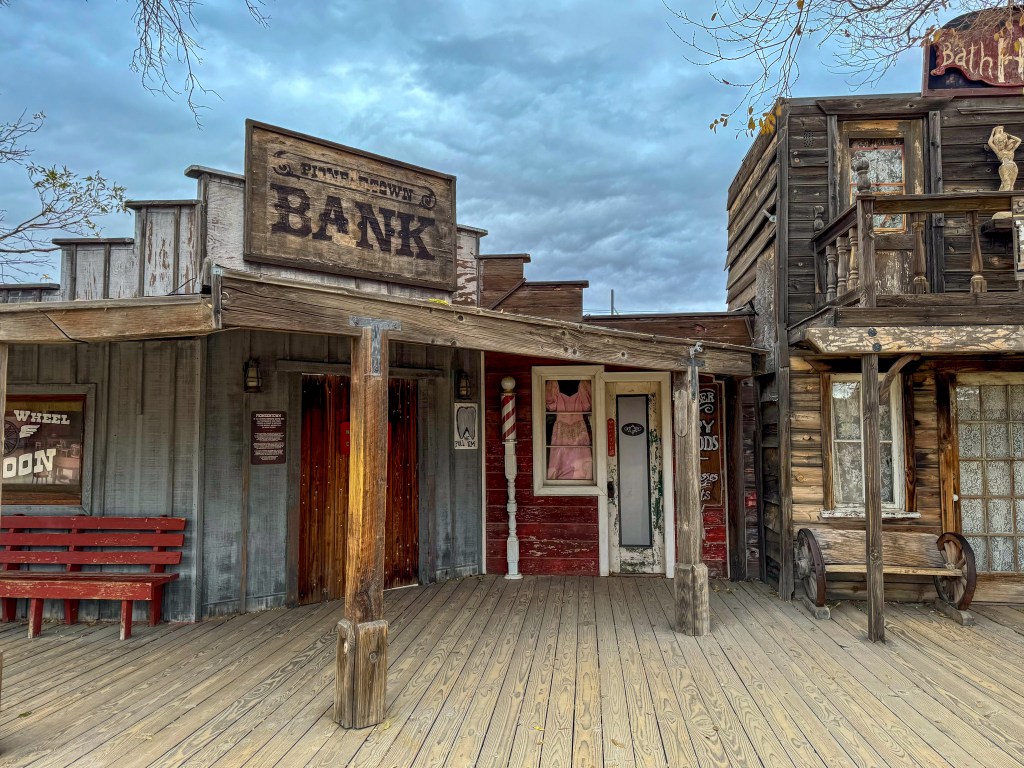
Other than our hikes, we made a quick visit to Pioneertown, an old western-style town that was previously used as a movie set. It is located around an hour from Indio, and is very close to Joshua Tree National Park. There are several shops you can visit along the main strip in Pioneertown, you can grab a drink at the historic Red Dog Salon, and visit the Film Museum, which displays posters of all the movies and TV shows that were filmed in Pioneertown.
Lastly, we made multiple visits to Chef Tanya’s Kitchen while exploring the desert. We enjoyed trying multiple different plant-based sandwiches (my favourite was the Chupacabra Chick’n), soup and ice cream – we cannot believe we did not know about this restaurant sooner!
The Road to Las Vegas
The drive from Indio to Las Vegas is supposed to take 4-hours; however, we made a few stops along the way, and it ended up taking us 8-hours. The problem with our timing was that we had tickets to the Vegas Golden Knights game that evening, and while we made it shortly after 7pm, we missed the warm-up and player introductions, which are Justin’s favourite parts. We would have made it on time had we not taken the wrong road through the Mojave Desert, and encountered terrible traffic on highway-15 due to a multi-vehicle accident.
Despite being late for the hockey game, we really enjoyed the stops we made on the way to Las Vegas:
- Amboy Crater: The Amboy Crater is an extinct volcano located along the iconic Route 66 (more about Route 66 below). Apparently, the Amboy Crater last erupted over 10,000 years ago. You can actually hike into the Crater, but unfortunately we did not budget enough time for this (clearly) – we definitely hope to do this hike during a future visit, as the photos I have seen online look incredible! I will not bother sharing the photo I took, as it does not do this amazing sight justice.
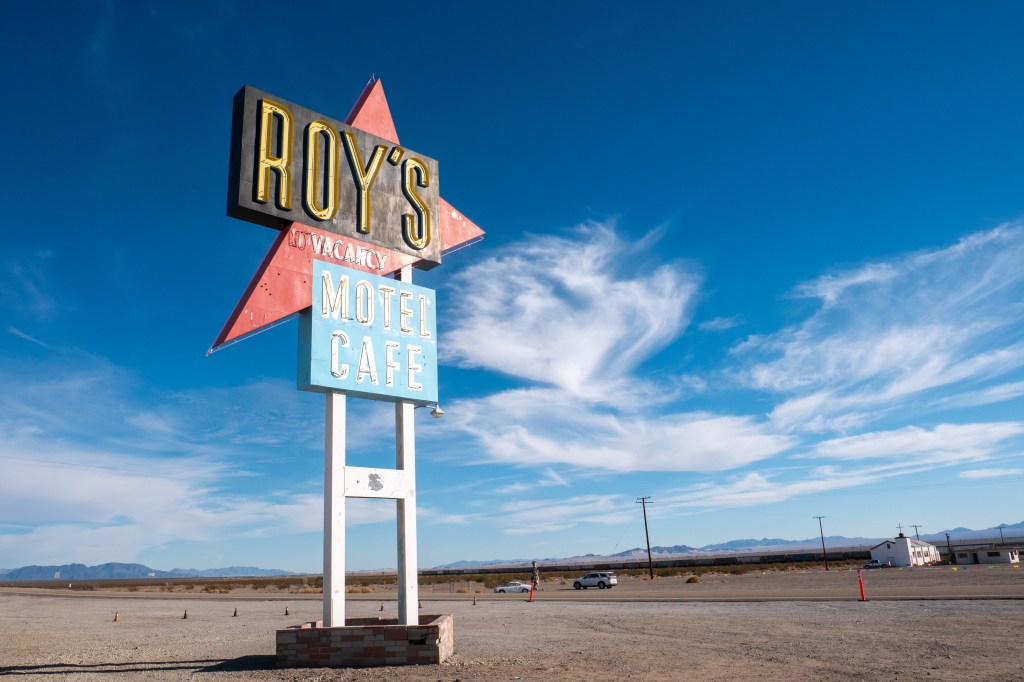
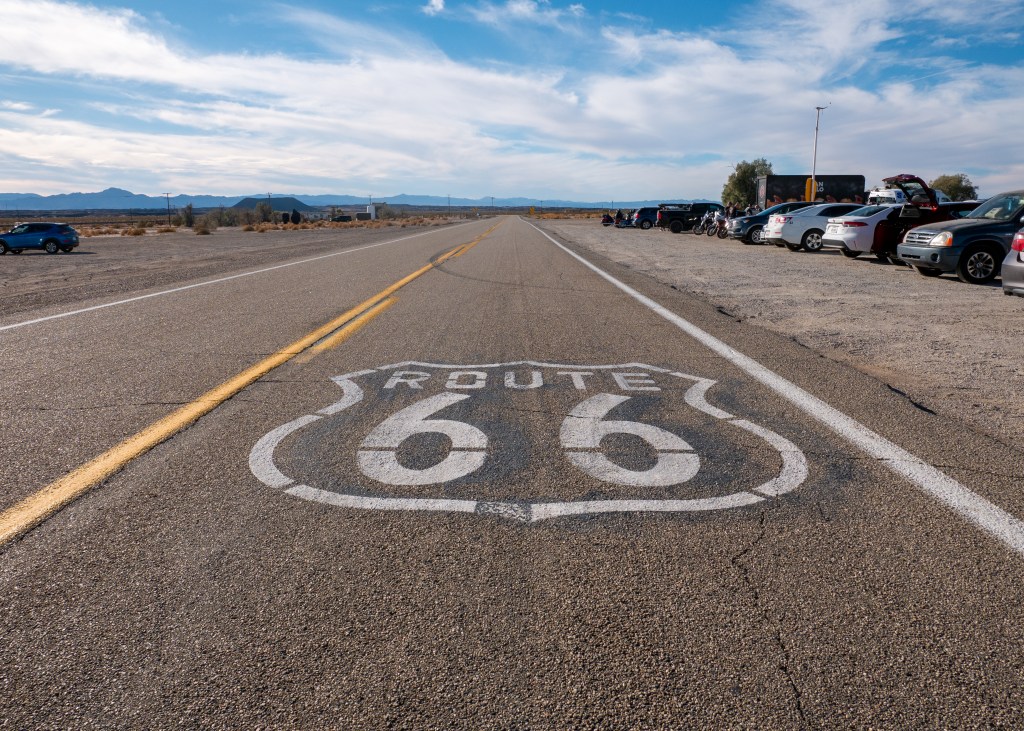
- Roy’s Motel and Cafe: Our next stop, just a couple of minutes further down Route 66, was Roy’s Motel and Cafe. In case you did not know, Route 66, often referred to as the “Main Street of America,” is one of the most well-travelled highways in the United States. It is 3,940km in length, and stretches from Santa Monica, California, all the way to Chicago, Illinois. While no longer in operation, Roy’s Motel and Cafe used to be a popular rest stop for travellers journeying through the desert up until the late 1970s. It just so happened that the day we were passing through (November 30, 2024), was the day Roy’s Motel and Cafe was having its Historic Mural and Monument Reveal event in honour of its 86th anniversary. There were food vendors on site, live music, and a lot of people! While we were not able to stay for the reveal ceremony (in an attempt to make it to the hockey game on time), we really enjoyed this stop! There are a lot of very cool photo opportunities here, as well – there is the neon Roy’s Motel and Cafe sign (which I can imagine looks very cool at night), and the Route 66 sign is painted onto the road in front. We may or may not have attempted to get some jumping photos on the highway with the two signs…
- Mojave National Preserve: One of the faster routes to get to Las Vegas from Indio is actually to cut through the Mojave National Preserve and connect to highway-15. Since this was the recommended route, we decided to make a couple of stops within the protected desert land. Our first stop was at the massive Kelso Dunes. While I have seen sand dunes before (when we visited the Yukon), the Kelso Dunes are massive compared to the small desert in Carcross – the tallest sand dune in Kelso is more than 600 feet tall! For some reason, I find tall mounds of sand deposited amongst other rock formations fascinating, even in the desert ツ.

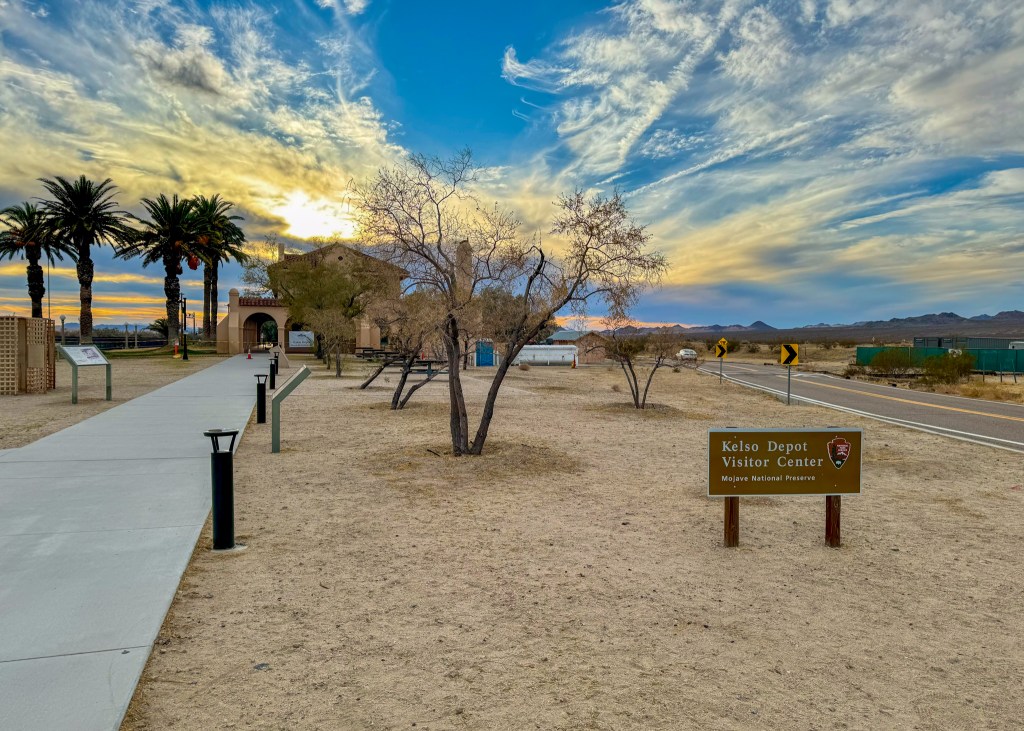
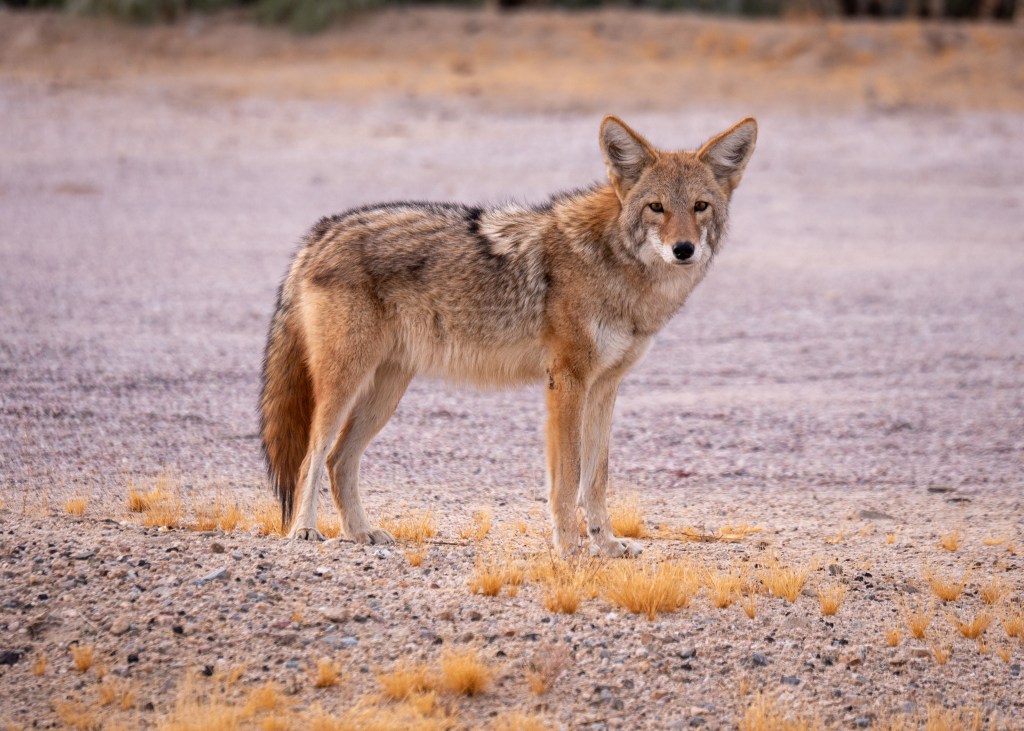
We also stopped at the Kelso Depot Visitor Center. Here, we learned that Kelso used to be a booming mine town following World War II, and we also saw the original Kelso Jail that was used between 1940 and 1985 for housing “drunks and unruly individuals.” There is a lot of history and interesting sights within the Mojave National Preserve – we barely scratched the surface with our quick visit. We also saw some wildlife near the Museum, specifically a roadrunner, and a coyote – is it possible that our favourite Warner Bros. cartoons were inspired by the Mojave Desert? Fortunately for the road runner, Wile E. Coyote was on his best behaviour ツ. My distraction and determination to take a photo of the coyote is ultimately what resulted in us taking the wrong road when leaving the Kelso Depot Visitor Center. Instead of taking the Kelso Cima Road, we ended up on Kelbaker Road, adding several kilometres to our journey, and this did not allow us to skip the accident on highway-15.
Well, I originally planned to also write about our adventures through Death Valley National Park and our stops in Nevada – but since this blog is longer than anticipated already, I will report on the rest of our trip in a separate post ツ.
Always grateful,
Michelle

Local Hikes of 2024
Well, it is that time of year again, where I do a recap of all the local hikes we did in 2024! As a reminder, “local” means the start of the trailhead is within a 2-hour drive from home.
A quick note that all my references to trail length and elevation are from the AllTrails app, cross-referenced with the statistics from my Apple Watch. If you do not already have the AllTrails app, I would definitely recommend downloading it, as it is great for discovering trails in areas you are visiting, and you can download offline maps to use when you do not have cell service.
Make sure to also check out my Local Hikes of 2022 and Local Hikes of 2023 blog posts for more hiking inspiration!
Lindeman Lake Trail, Chilliwack – July 2024
When we were deciding what trail to do, we settled on the Lindeman Lake Trail due to its length and tree coverage. The day we had picked for this hike was expected to be quite warm (over 30°C), and we had 3 dogs with us, which is why we were looking for a short trail that offered shade. We started the hike at 8am (which meant I had to get up at 5am… ouch!), and we were done around 10am in order to beat the heat. I would definitely recommend starting the hike at this hour or earlier, regardless of the weather, as the trailhead parking is small and fills up quickly.
This out-and-back trail is 3.4km round trip, and I would classify it as moderately difficult due to the large rocks and tree roots you have to navigate at the start (and end) of the trail. Overall, we really enjoyed this hike – Lindeman Lake is stunning, and it offers a fun and relaxing atmosphere with many people camping in the forest along the trail, and swimming and paddle boarding on the Lake.
Cheam Peak, Chilliwack – August 2024
Cheam Peak has been on my bucket list of hikes for several years now. However, the road to get to the trailhead is only accessible with a 4×4 vehicle, which we do not have, and when we tried to coordinate going in the past, the dates we had picked were impacted by wildfire smoke.
But, 2024 was the year we were finally able to do this amazing hike, and we owe a big thank you to our friends Josh and Jess for driving us! While Google Maps will tell you that the road up the mountain to the trailhead is only 30 minutes, it is actually closer to an hour, as you have to drive very slowly and carefully through the cross ditches – hang on tight!
Cheam Peak is an 8.7km out-and-back trail, and has an elevation gain of 679m. Fortunately, the switchbacks make the elevation gain more tolerable, but there is very little shade along this trail – it is definitely recommended to start early. An early start has other benefits, as well – parking is a premium at the trailhead, and as the temperature increased during our hike, so did the bugs!
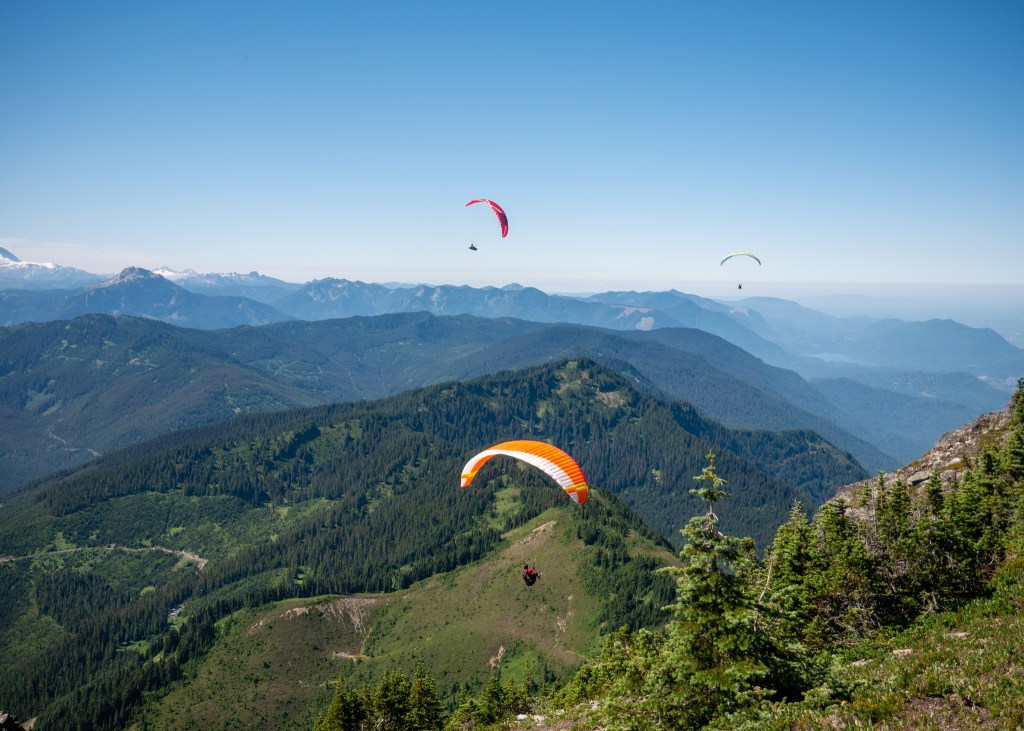
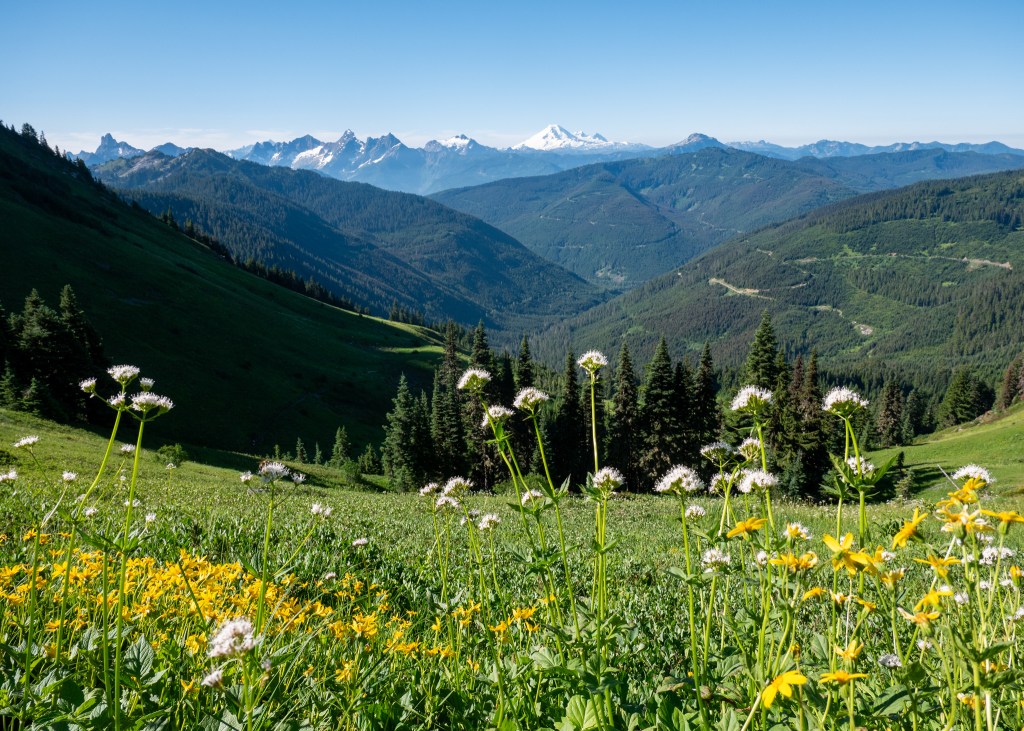
Overall, Cheam Peak is probably the nicest hike I have ever done – you are surrounded by wildflowers, beautiful meadows, and views of Mount Baker for the entire duration of the trail. Once you reach the top, you are rewarded with 360° views of the Fraser Valley – on a clear day, you can see Chilliwack, Harrison Lake, the Fraser River, Cultus Lake and more. It was also very cool to see people paragliding near the peak. This trail is a must see!

Grouse Grind Trail, Vancouver (Grouse Mountain) – August 2024
The Grouse Grind Trail, otherwise known as Mother Nature’s Stair Master, is likely not the most enjoyable hike, but it is definitely a trail you should attempt at least once. It is a one-way trail that is 2.5km in length, and has an 800m elevation gain. Hikers cannot go down the Grouse Grind Trail – they must purchase a gondola pass to return to the parking lot.
I have done the Ground Grind a handful of times in the past, but this was my most successful attempt with a time of 46-minutes and 11 seconds. Somehow, I found the energy to sprint up the last rock scramble, beating Justin by at least 3 seconds – I will make sure he does not forget it, too ツ.
While there are no views along the trail, I feel the views of Vancouver at the top are definitely more rewarding if you hike to them rather than taking the gondola (although I realize this is not an option for everyone). There are many activities you can do at the top of Grouse Mountain such as visiting the Chalet, seeing the Lumberjack Show, and seeing the Refuge for Endangered Wildlife. Following our hike, we paid a quick visit to the wildlife refuge to see the Grizzly Bears, Grinder and Coola, before heading back down the Mountain.

Saint Mark’s Summit, West Vancouver (Cypress Mountain) – August 2024
Saint Mark’s Summit is a 10km hike located on Cypress Mountain in West Vancouver. While we picked an overcast day to do this hike, but were hoping that with a later start (10am), the weather would clear up; however, our views at the top were completely cloud covered – we were very disappointed!
I would consider the hike, itself, to be more challenging due to the length, elevation gain (567m) and the exposed roots along the trail. I would strongly recommend hiking poles if you have them, especially on the way down – we witnessed a couple of bad falls. This hike was also very busy – similar to the other hikes, definitely try to get an early start, and try to go on a clear day!
Teapot Hill, Chilliwack – August 2024
As the name suggests, there are actual teacups and teapots hidden throughout the entire Teapot Hill Trail, making for a fun scavenger hunt throughout the hike! Overall, this is a fairly easy to moderate out-and-back trail (under 5km in length, and 255m in elevation gain) with views of the Fraser Valley at the end. We decided to do this hike last minute after a rain storm – it made for a leisurely afternoon stroll, since it only took us 1.5-hours to complete.

Norvan Falls, North Vancouver – September 2024
Similar to Cheam Peak, we have been talking about doing the Norvan Falls trail for the last couple of years – 2024 was the year we finally checked it off the list!
While Norvan Falls is rated as moderate on AllTrails, what made it challenging was the length – it is 14km long and took us around 3.5-hours to complete. This was a great hike for us to do on a warmer day, as the trail offers generous shade and tree coverage. We enjoyed walking amongst the luscious greenery and along the Lynn Valley Creek before getting to the major attraction – the 30m waterfall at the end. The waterfall area is a great spot to enjoy lunch or a snack, and to take a break before getting back on the trail.

Eagle Bluffs via Black Mountain Trail, West Vancouver (Cypress Mountain) – September 2024
If you have been following my blog over the last couple of years, you will know that we have previously completed the Eagle Bluffs Trail – this was actually my third time doing the hike. However, it was a great reminder of just how beautiful this hike is – it has multiple viewpoints along the way, passes many small lakes, and provides stunning views of West Vancouver at the end.
In case you need the reminder, this trail is just under 8km long and has an elevation gain of 437m. Most of the incline is at the start of the trail, which means you get the hard part out of the way early, and can enjoy the rest of the hike. With that being said, I would definitely recommend bringing hiking poles for this trail – they are especially helpful on the way back, as the steep incline contains loose rock and gravel, and can be quite slippery.

Jack’s Trail, Four Lake’s Trail and 50 Shades of Green Trail, Squamish – September 2024
Back in September, my friend Jeanette took us on an adventure through a network of trails in Squamish. We completed an 11km loop in 2.5-hours that touched three different trails: Jack’s Trail, Four Lake’s Trail and the 50 Shades of Green Trail. We passed multiple lakes on this trail, one of which was Alice Lake – another location I have been wanting to visit. Overall, we very much enjoyed exploring these multiple trails in Squamish.
Nairn Falls Trail, Pemberton – October 2024
Last but not least for our 2024 hikes was the Nairn Falls Trail. This Trail is technically 2.5-hours away from home, but I wanted to make sure it was included in this list! We had planned a day trip to Pemberton that day, as one of our favourite restaurants (The HWY. Cafe) was closing down, and we wanted to fit in one last visit. On our way back, we made an impromptu stop at Nairn Falls to complete this short, scenic trail. You will walk along the Green River for a little under 1.5km (one way) before reaching the waterfall. The entire hike takes under an hour to complete, making it easy to fit into your itinerary when visiting the Pemberton area.

Well, I think that covers all the hiking we did in 2024! I hope everyone had a wonderful holiday season, and I want to wish you all the best in 2025! Thank you so much for continuing to support my blog this year, and I hope you will enjoy reading the blog posts I have planned for 2025!
Always grateful,
Michelle
